My HW/SW setup:

Dongle: SDR USB Dongle (Realtek RTL2832U R820T chipset, other SDR dongles may also work). Search Ebay for RTL2832U dongles. They should all work.

OS: Windows 7, 64bit

Capture software: SDR# from sdrsharp.com

Decoder: AFSK1200

Note: Don’t install any software drivers that came with the SDR Dongle. Uninstall the drivers, if you already installed them.

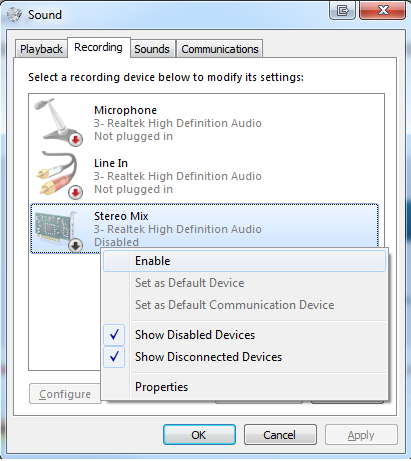
1. Setup stereo mix:

Stereo mix is used to forward output sound to the microphone input. We need this, because AFSK1200 decoder will be listening to the microphone input. Open sound options in control panel or just go to start and enter mmsys.cpl. Using USB headset will not work, you need analog speakers. There are some workarounds to use USB headsets but I haven’t tried them yet.

Playback tab: set speakers to the default device.

speakers

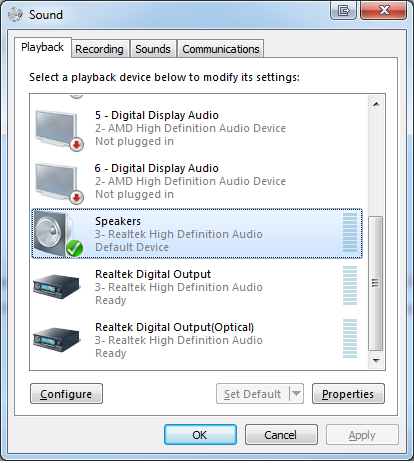
Recording tab: if you don’t see the “Stereo mix device”, it’s probably hidden.

  • Right click anywhere in the field where devices are listed and tick “Show disabled devices“, “Show disconnected devices. Stereo mix shold be available now.
  • Right click on it and select “Enable“.

recording2

2. Download  and configure SDR# software:

  • Download http://sdrsharp.com/downloads/sdr-install.zip
  • Extract it and run install.bat
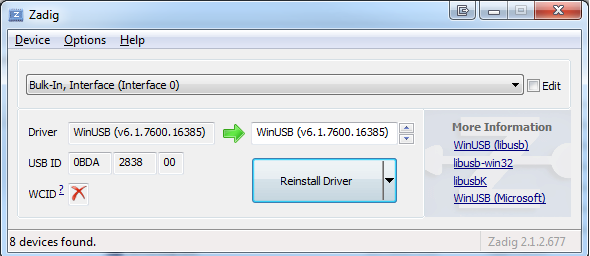
  • Plug in your SDR dongle, go to sdrsharp folder and run zadig.exe. Go to Options and tick “List all devices“. Select “Bulk-In, Interface (Interface 0)” and click “Install Driver”. (On my screenshot, you can see “Reinstall Driver, because I already installed it). Note: You will need to install driver again if you replug the dongle in another USB port.
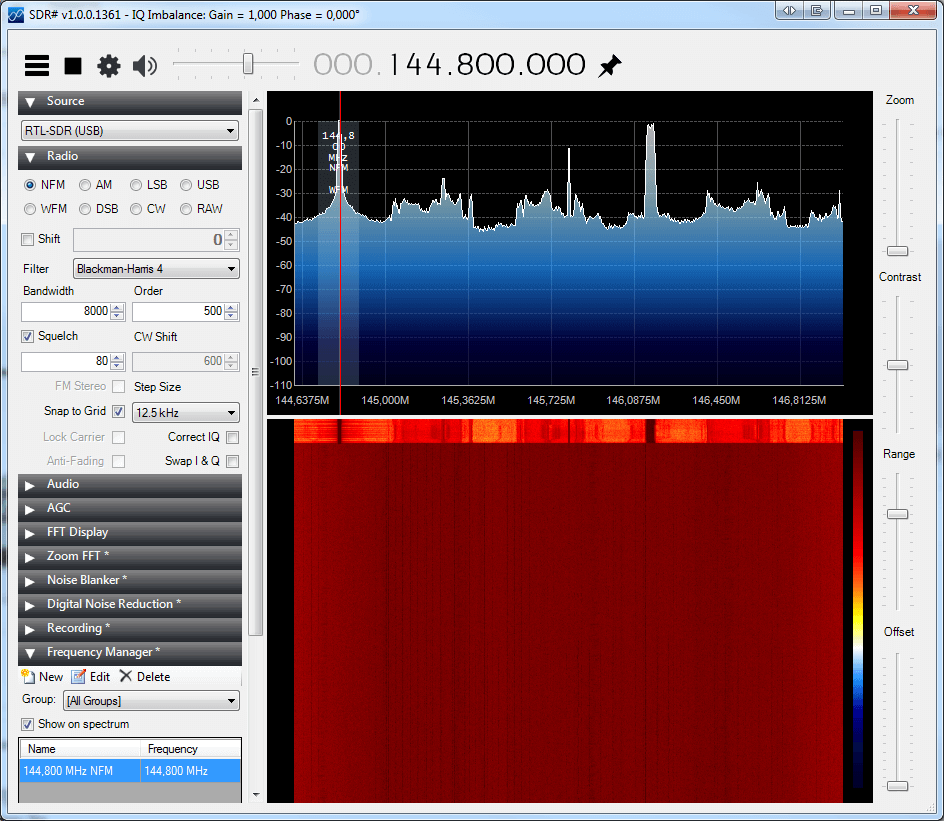
zadig

  • Run SDRSharp.exe
  • Source -> RTL-SDR (USB)
  • Radio -> NFM, enable Squelch and set it between 50 and 80, you can increase or decrease it depending on your surrounding environment
  • Frequency Manager -> New -> add the frequency you want to monitor, in my case it’s 144.800 Mhz.
  • Click on Play button at the top of SDR# You will see spikes when something is transmitting on the frequency

sdrsharp

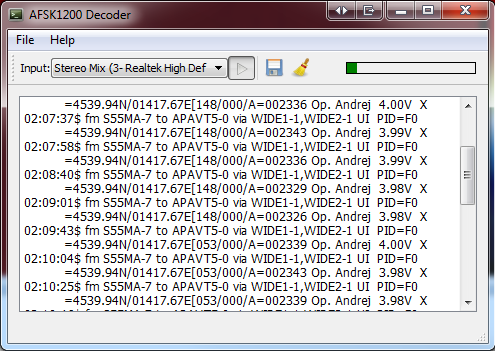
3. Decode packets with AFSK 1200 Decoder:

  • Download AFSK 1200 Decoder
  • Select Input and choose Stereo mix
  • Click play button. You are now decoding APRS packets

afsk1200

Don’t forget to disable stereo mix and set the default playback device as you had before when you finish decoding.

I used my RaspberryPI to setup an APRS digipeater. The software I used is called Xastir. The problem is, there are no good default maps to use in Xastir.

This tutorial will guide you how to install OSM maps into Xastir software. Maps are generated on a Windows machine, then transferred to a Linux machine where Xastir is running.

TL;DR version:

1. Download Taho application for Windows.

2. Select area, copy bbox text.

3. Paste bbox text to Taho, click on bbox button, select parameters and click on make maps.

4. Upload generated .inf and .jpg files to your Xastir map folder.

5. Download inf2geo.pl to your linux machine and convert .inf files to .geo files.

6. Start or restart Xastir, select your map and apply.


Detailed version:

1. Download Taho application for Windows (Version 4.01 didn’t work on my PC, you should download older versions, if you can’t run the newest version).

2. When you launch the Taho application, it will also open the bbox tool site.

3. On the bbox tool site, center map to your desired location and click button “select area”. Select your area.

Note: If you select too big area, you won’t be able too select top zoom levels in the next steps.

bboxtool

4. Copy code in the grey box to your clipboard.

greybox


5. Open Taho application and paste the code into “Get from <bbox…>” field. Click on the bbox button now. It should populate coordinates into Taho application. Select UI-View in Kal.-Files, .jpg for file type, zoom level (16 is good for small city), size (should be free, whole area in 1 file), define path for saving your maps and click on make maps button.

steps


6. Each selected zoom level generates separate .jpg and .inf files in your defined maps path (step above).

7. Xastir doesn’t know how to handle .inf files so we need to convert them to .geo format. Upload your .jpg and .inf files to Xastir map folder. In my case, maps are located in  /usr/share/xastir/maps Fire up your linux console and

Download inf2geo.pl converter and convert .inf files:

sudo cd /usr/share/xastir/scripts
sudo wget https://raw.githubusercontent.com/mgrennan/xastir/master/scripts/inf2geo.pl
sudo chmod +x inf2geo.pl
sudo ./inf2geo.pl /usr/share/xastir/maps/yourmap.inf

By now, you should have yourmap.geo file in /usr/share/xastir/maps
Open .geo file with your favourite editor and correct the path if you have to.

FILENAME    maps/yourmap.jpg
TIEPOINT    0           0       16.0645 45.8288333333333
TIEPOINT    5631        5887    14.661666666667        46.8525
IMAGESIZE   5632        5888
#5632x5888
#
# Converted from a .INF file by WE7U's inf2geo.pl script
#

Note: If you change the name of the file, you also have to change FILENAME in yourmap.geo accordingly.

8. Start or restart Xastir, go to Map -> Map Chooser -> select your map -> Apply -> profit.