Prerequisites:

– raspbian OS
– CA cert, client cert and cert password, client key

You can use .p12 file and convert it to .pem, it will include client cert and client key in the same file. Let’s say you download .p12 file from PfSense cert manager. Convert it with:

openssl pkcs12 -in test.p12 -out test.pem
Enter Import Password: leave empty
Enter PEM pass phrase: testing1234
Verifying - Enter PEM pass phrase: testing1234

First, delete openresolv and dhcpcd5 because it’s conflicting with native network management:

apt purge openresolv dhcpcd5

Disable wpa_supplicant:

systemctl disable wpa_supplicant

Install nmcli:

apt install network-manager

Comment out everything in /etc/network/interfaces and in /etc/wpa_supplicant/wpa_supplicant.conf and then Reboot Pi

Create wifi connection:

nmcli c add type wifi ifname wlan0 con-name "My-Wifi" \
      802-11-wireless.ssid "WIFI-SSID" \
      802-11-wireless-security.key-mgmt wpa-eap \
      802-1x.eap tls \
      802-1x.identity test \
      802-1x.ca-cert /home/pi/CA.crt \
      802-1x.client-cert /home/pi/test.pem \
      802-1x.private-key /home/pi/test.pem \
      802-1x.private-key-password testing1234

Depending on the network-manager version, the commands above might not work, so just enter it manually line by line:

nmcli con add type wifi ifname wlan0 con-name My-Wifi ssid WIFI-SSID
nmcli con edit id wifi
nmcli> set 802-11-wireless.ssid WIFI-SSID
nmcli> set 802-11-wireless-security.key-mgmt wpa-eap
nmcli> set 802-1x.eap tls
nmcli> set 802-1x.identity test
nmcli> set 802-1x.ca-cert /home/pi/CA.crt
nmcli> set 802-1x.client-cert /home/pi/test.pem
nmcli> set 802-1x.private-key-password testing1234
nmcli> set 802-1x.private-key /home/pi/test.pem
nmcli> save
nmcli> quit

Check connection with:

nmcli connection
NAME                UUID                                  TYPE      DEVICE
My-Wifi             f0c28a28-934f-4dbc-823f-b3c1653bb047  wifi      wlan0

Start connection:

nmcli connection up My-Wifi

If you want to start over, you can delete connection with:

nmcli connection delete My-Wifi

You can also view and edit profile at /etc/NetworkManager/system-connections/My-Wifi.nmconnection

cat /etc/NetworkManager/system-connections/My-Wifi.nmconnection
[connection]
id=My-Wifi
uuid=f0c28a28-934f-4dbc-823f-b3c1653bb047
type=wifi
interface-name=wlan0
permissions=

[wifi]
mac-address-blacklist=
mode=infrastructure
ssid=WIFI-SSID

[wifi-security]
key-mgmt=wpa-eap

[802-1x]
ca-cert=/home/pi/CA.crt
client-cert=/home/pi/test.pem
eap=tls;
identity=test
private-key=/home/pi/test.pem
private-key-password=testing1234

[ipv4]
dns-search=
method=auto

[ipv6]
addr-gen-mode=stable-privacy
dns-search=
method=auto

1. Update system and optionally disable X Desktop, we don’t need GUI

apt-get update
apt-get upgrade
raspi-config

Select menu: 3, B1, B1

2. Install dependencies

apt-get install subversion libsigc++-2.0-dev g++ make libsigc++-1.2-dev libgsm1-dev screen \
libpopt-dev tcl8.5-dev libgcrypt-dev libspeex-dev libasound2-dev alsa-utils install qt-sdk git groff -y

3. Add a new user

adduser svxlink

4. Download svxlink source

cd /usr/src; wget https://github.com/sm0svx/svxlink/archive/15.11.tar.gz; tar xvf 15.11.tar.gz; cd svxlink-15.11/src; mkdir build; cd build

5. Compile and install svxlink

cmake -DCMAKE_INSTALL_PREFIX=/usr -DSYSCONF_INSTALL_DIR=/etc \
        -DLOCAL_STATE_DIR=/var ..
make
make doc
make install
ldconfig

6. Install sounds

cd /usr/share/svxlink/sounds; wget https://github.com/sm0svx/svxlink-sounds-en_US-heather/releases/download/14.08/svxlink-sounds-en_US-heather-16k-13.12.tar.bz2
tar xvf svxlink-sounds-en_US-heather-16k-13.12.tar.bz2
mv en_US-heather-16k en_US; rm -rf svxlink-sounds-en_US-heather-16k-13.12.tar.bz2

7. Configure sound levels

alsamixer

Press F6 and select usb soundcard.
Press F5 to show all.
Increase gain on CAPTURE, around 80 is fine, experiment otherwise.
Exit alsamixer and save the settings with:

alsactl store

8. Tweak configuration files in /etc/svxlink/svxlink.conf and /etc/svxlink/svxlink.d/ModuleEchoLink.conf

svxlink.conf: I will show you only modified lines

Uncomment LOCATION_INFO=locationInfo to show your Echolink on aprs.fi map.
MODULES=ModuleEcholink
CALLSIGN=Yoursign-L
SHORT_IDENT_INTERVAL=0
LONG_IDENT_INTERVAL=0

Under [Rx1]

AUDIO_DEV=alsa:plughw:1 #Hardware ID of the soundcard, usually 1 on rpi with usb soundcard
SQL_START_DELAY=100 #Prevent TX, RX loop
VOX_THRESH=500 #Increase if your VOX gets falsly opened

Under [Tx1]:

AUDIO_DEV=alsa:plughw:1
PTT_TYPE=SerialPin
PTT_PORT=/dev/ttyUSB0 #Depends what you have for PTT triggering, I do it with RS232 to USB converter

Under [LocationInfo]
#This is mostly self explanatory

APRS_SERVER_LIST=poland.aprs2.net:14580
STATUS_SERVER_LIST=aprs.echolink.org:5199
#Go to maps.google.com, select your location, right click, what's here
#and you'll get coordinates, for example: 45.660325, 14.291537 Go to https://rechneronline.de/winkel/degrees-minutes-seconds.php
#and convert from decimal degrees provided from maps.google.com to degrees, arc minutes, arc seconds.
#Enter converted
#coordinates.

LON_POSITION=14.17.29E
LAT_POSITION=45.39.37N
CALLSIGN=EL-yourcallsign
FREQUENCY=145.275
TX_POWER=5
ANTENNA_GAIN=0
ANTENNA_HEIGHT=5m
ANTENNA_DIR=-1
PATH=WIDE1-1
BEACON_INTERVAL=10
TONE=123
COMMENT=SvxLink by SM0SVX (svxlink.sourceforge.net)

ModuleEcholink.conf:

ALLOW_IP=192.168.0.0/24 #Depends on your home network setup,
#it could be also ALLOW_IP=192.168.1.0/24
SERVERS=europe.echolink.org
CALLSIGN=yoursign-L
PASSWORD=your echolink password
SYSOPNAME=yourname
LOCATION=[Svx] comment about your echolink
LINK_IDLE_TIMEOUT=0
AUTOCON_ECHOLINK_ID=ID of the remote repeater for example AUTOCON_ECHOLINK_ID=609569
AUTOCON_TIME=1200
DESCRIPTION=edit text to fit your needs
reboot

9. Run svxlink

svxlink

Try to transmit, usb soundcards on rpi are tricky. You will probably get a warning:
Rx1: Distorsion detected! Please lower the input volume!
Don’t worry about it.
Exit and run svxlink as daemon

svxlink --daemon

10. Start svxlink at boot
You need to wait some time after boot for Pi to initialize devices.
It will not work when you start svxlink immediately after the boot,
the process will run but there will be no access to PTT. Open
/etc/rc.local and add this two lines at the end of the file, before exit 0

sleep 120
/bin/bash -c '/usr/bin/svxlink --pidfile=/var/run/svxlink.pid --daemon'

This will start svxlink 2 minutes after boot.

This is to internet only, not to RF. You need TNC software and a radio station to send it via RF.

We need ncat which is a part of nmap and bc.

sudo apt-get install nmap bc

First, some usefull tools:
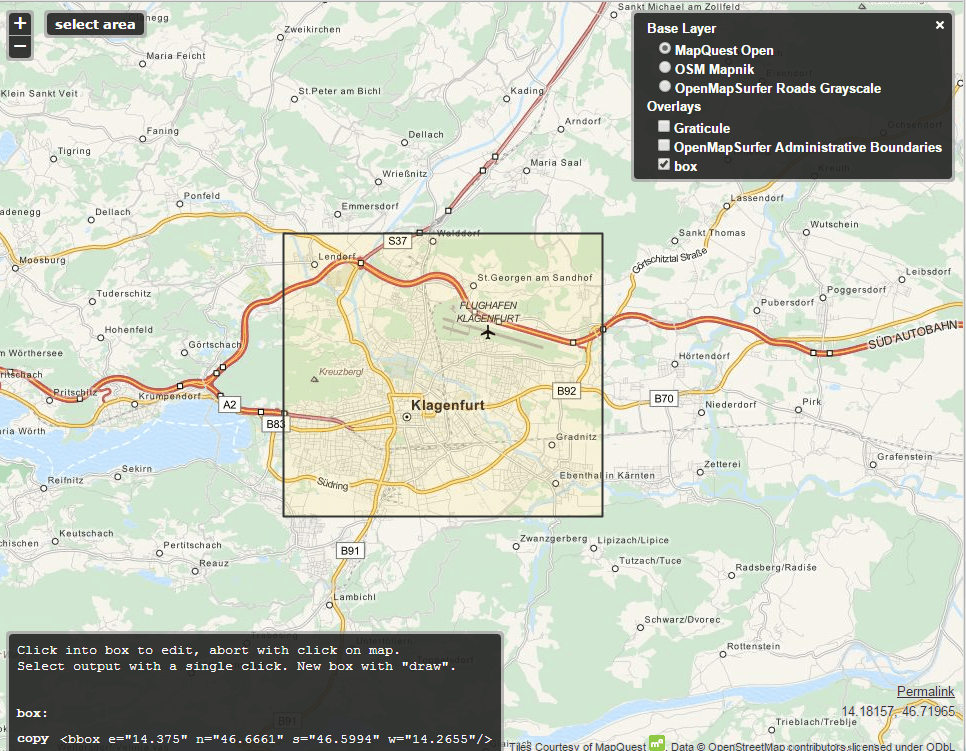
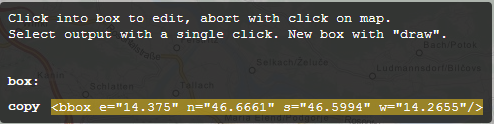
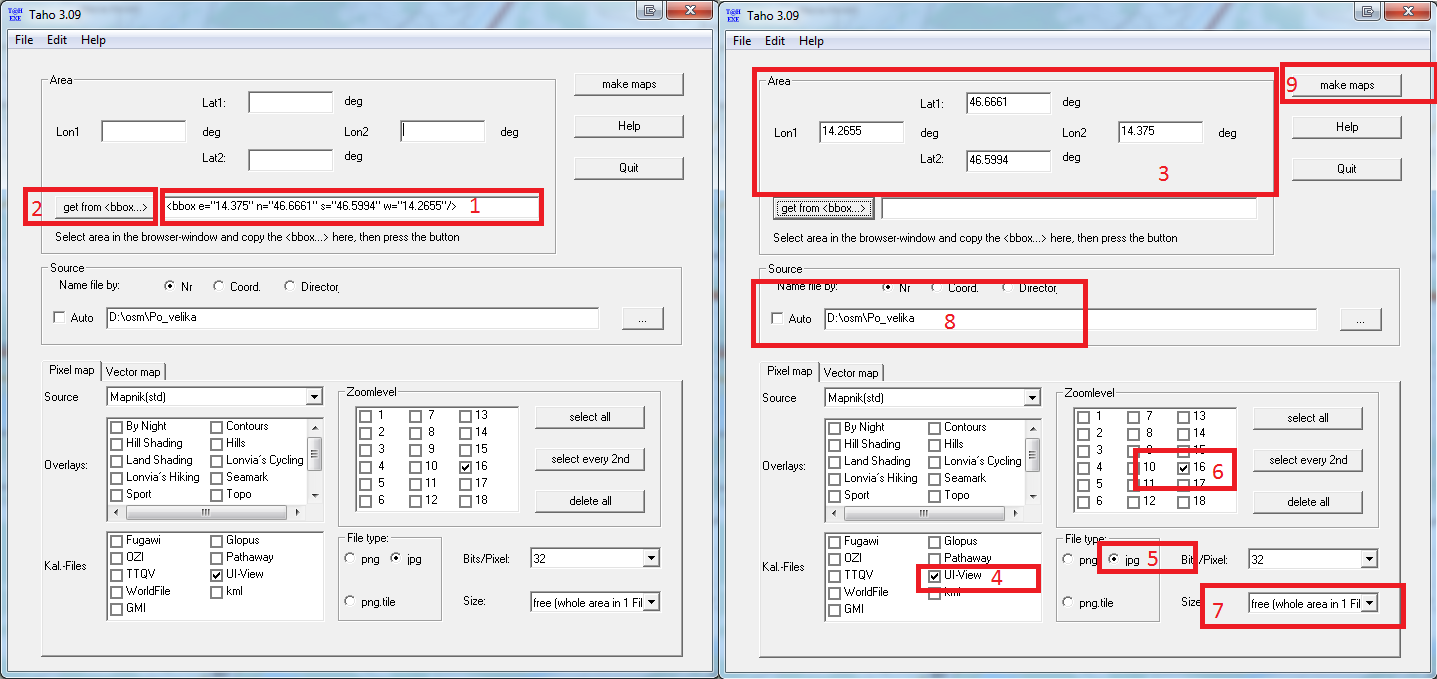
APRS coordinate converter: http://digined.pe1mew.nl/?How_to:Convert_coordinates
APRS passcode generator: http://apps.magicbug.co.uk/passcode/

There are more APRS IS servers available to connect to, I decided to use poland.aprs2.net, the generic one is rotate.aprs.net.
Default port is 14580.

The protocol goes like this (more info http://www.aprs-is.net/Connecting.aspx):
– Authenticate with APRS-IS server
– Send data

So the data you are sending is:
– user yourHAMSIGN pass passcode
– objectdata

Bash one line command to send data:

printf "%s\n" "user yourHAMSIGN pass passcode" "yourHAMSIGN>APN100,TCPIP*:=latitude/longtitude-comment" | ncat poland.aprs2.net 14580

Example:

printf "%s\n" "user S55MA-13 pass 23558" "S55MA-13>APN100,TCPIP*:=4246.29N/01412.79E_247-QTH" | ncat poland.aprs2.net 14580

This should place S55MA-13 on a map with a house icon.
Look into aprs.fi raw data for your ham sign (https://aprs.fi/?c=raw&call=yourHAMSIGN) to find any formatting errors. It should look like this:

2017-07-27 16:18:32 CEST: S55MA-13>APN100,TCPIP*,qAC,T2POLAND:=4246.29N/01412.79E_247-QTH

Important: With this commands you can place (fake) or “steal” an objects that are not your own stations by placing another station sign in the second yourHAMSIGN field. This will work, but it will look like the object is coming via another station, igated by your station. That’s ok, the object will be placed correctly on the map, but for the sake of following correct protocol procedures, you need to change a string a little bit so the other station object will show correct path of where it’s coming from.

When placing another object (not your own) on the map, you need to add the timestamp to the string. If the object is permanent, timestamp should be “111111z” (http://www.aprs.org/info/object-perm.txt)

Example:

printf "%s\n" "user yourHAMSIGN pass passcode" "yourHAMSIGN>APN100,TCPIP*:;ANOTHERSTATION_CALLSIGN *111111zlatitude/longtitude-comment" | ncat poland.aprs2.net 14580
printf "%s\n" "user S55MA-10 pass 22358" "S55MA-10>APN100,WIDE2-1*:;S55MA-14 *111111z4139.94N/01217.67E-test" | ncat --send-only poland.aprs2.net 14580

Note: ANOTHERSTATION_CALLSIGN is by protocol defined as 9 characters long and you need to add whitespaces between ANOTHERSTATION_CALLSIGN and *111111z
Example: S51Y has four characters only so you need to add 5 whitespaces between ANOTHERSTATION_CALLSIGN and *111111z
The string would look like:

printf "%s\n" "user S55MA-10 pass 22358" "S55MA-10>APN100,WIDE2-1*:;S51Y     *111111z4139.94N/01217.67E-test" | ncat --send-only poland.aprs2.net 14580

If you don’t want to use one line command, you can create a simple script (for placing your own station):

#!/bin/bash

#Define login info
user=yourHAMSIGN
password=passcode

#Define object user info
senduser=yourHAMSIGN

#Define APRS-IS server
server=poland.aprs2.net
port=14580

#Define station location
lat=4146.72N
lon=01213.80E

#Define data
comment="QTH"
data="$senduser>APN100,TCPIP*:=${lat}/${lon}-${comment}"

#Send data to the server
printf "%s\n" "user $user pass $password" "${senduser}>APN100,TCPIP*:=${lat}/${lon}-${comment}" | ncat poland.aprs2.net 14580

NOTE: Don’t send data to often. For objects it’s sufficient to send it every few hours. Don’t spam the network.

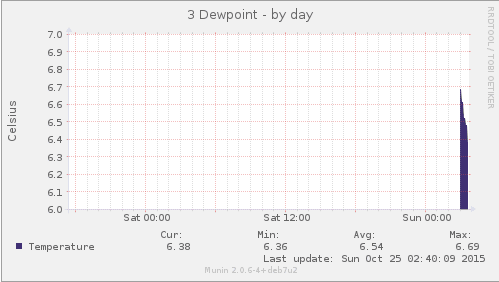
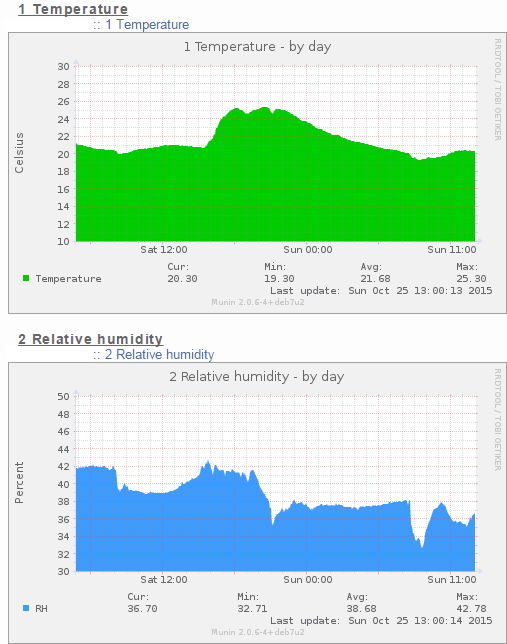
You can send telemetry the same way but it’s a little bit trickier because APRS protocol has coeficients for displaying the correct values.
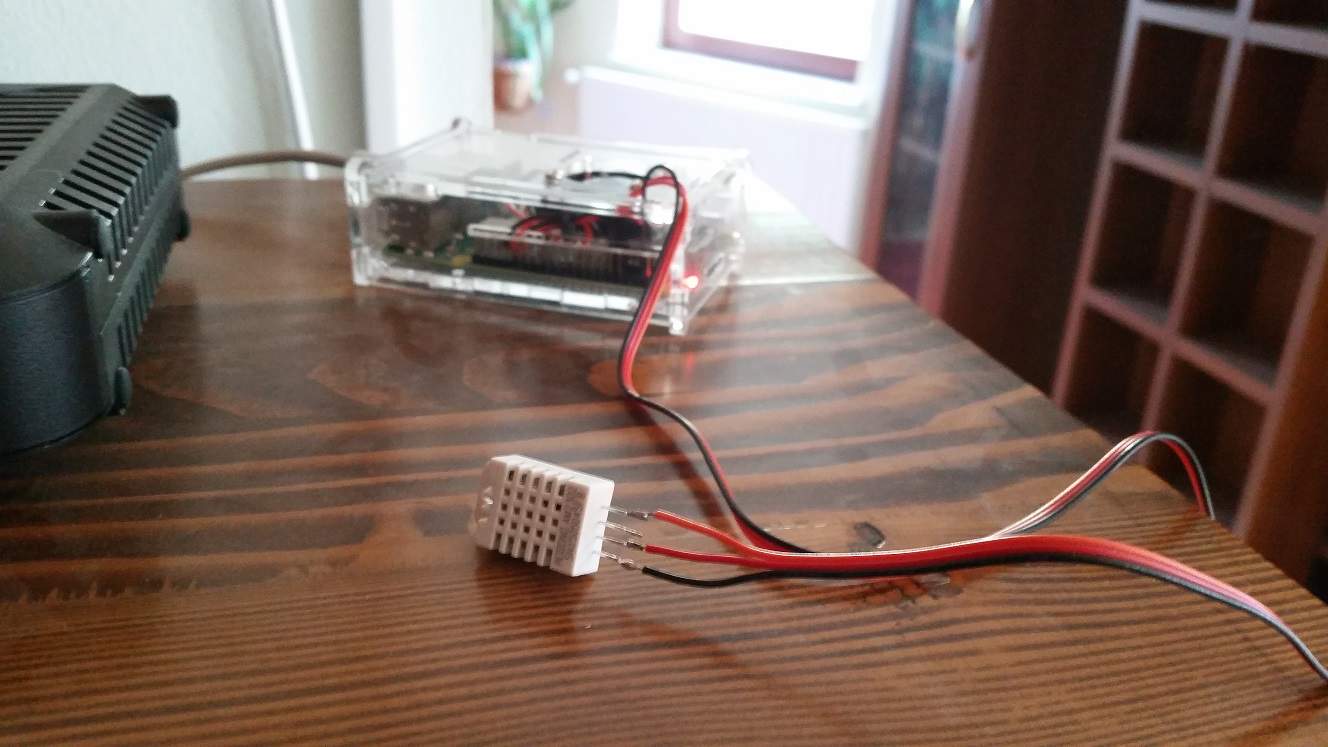
For example let’s say we’ll read a raspberryPI CPU temperature and send it to APRS-IS network.

#!/bin/bash
#Define login info
user=yourHAMSIGN
password=passcode

#Define object user info
senduser=yourHAMSIGN

#Define APRS-IS server
server=poland.aprs2.net
port=14580

#Define station location
lat=4146.72N
lon=01213.80E

#Define data
comment="QTH"
data="$senduser>APN100,TCPIP*:=${lat}/${lon}-${comment}"

#Authentication variable
aprsauth="user $user pass $password"

#Read raspberry-pi CPU temperature
tempraw=/opt/vc/bin/vcgencmd measure_temp #Read pi temperature

#Filter result to numbers only 
tempfloat="$(echo "$tempraw" | awk -F= '{print $2}' | awk -F\' '{print $1}')"

#Aprs telemetry protocol accepts 3 whole (int) 
#numbers only so we need
#to convert the result (tempfloat) into 3 whole 
#numbers. So if tempraw=40.3, it will
#convert it to 403. If tempraw=8.5, it will convert 
#it to 85 and we'll add the leading zero
#to create 3 number format 085 later bellow.
temp="$(echo "$tempfloat * 10" | bc | awk -F. '{print $1}')"

#Project comment
projectcomment=Rpi temperature

#Generate telemetry strings
#Read data and put it into variable
#%s means string
#%03d means prepend up to 3 zeroes, so if the value is 8, 
#you'll get 008, if the value is 80, you'll get 080 etc.
#This needs to be done or APRS will deny the packets as invalid. 
#The other things is, everytime you send the telemetry,
#a sequence number has to change, it's defined as T# in a APRS protocol. 
#We will automate this next.

#Check if file exist
if [ ! -f "/tmp/sequence_number.txt" ]; then
 touch /tmp/sequence_number.txt
fi

#Read sequence number. Everytime the scripts runs, the number will 
#rise by 1 until it comes
#to 1000 and then returns back to 0. Everytime the script
#will run, a sequence number will change.
read num < /tmp/sequence_number.txt
num=$((num + 1))
if (( num == 1000 )); then
 num=0
fi 

#Finally, we can start assembling the data. 
#$senduser goes to %s, $num goes to first %03d and $temp goes to 
#the last %03d in the string. 
printf -v t1 "%s>APN001,TCPIP*:T#%03d,%03d,000,000,000,000,00000000" "$senduser" "$num" "$temp"

#Define telemetry parameters
t2="$user>APN001,TCPIP*::$senduser :PARM.CPU Temp"

#Define telemetry units
t3="$user>APN001,TCPIP*::$senduser :UNIT.Deg.C"

#Add telemetry coefficient so the APRS protocol can convert your raw values
#into real value.
#We get the value in 3 whole numbers and we need to define coefficient so 
#the APRS protocol
#will know how to display the value. We add 0.1 to the second field, means
#if the value is 452, the temperature will be displayed as 45.2
t4="$user>APN001,TCPIP*::$senduser :EQNS.0,0.1,0,0,0,0,0,0,0,0,0,0,0,0,0"

#Send bits and project comment
t5="$user>APN001,TCPIP*::$senduser :BITS.00000000,$projectcomment"

#Another tricky part is, $senduser total lenght has to be 9 characters. 
#For example
#If my $senduser=S55MA-10 means it's only 8 characters long and we need 
#to add 1 space to it. S55MA-10 :PARM
#If my $senduser=S55MA means it's only 5 characters long and we need to 
#add 4 spaces to it S55MA    :PARM
#The same goes for UNIT, EQNS and BITS

#Send data to the server
#For telemetry to work we need to have an object before, from previous script.
#We'll only send an object and telemetry non value data every hour so we don't 
#spam the network.
#We need to compare dates to see if 1 hour is past.

#Check if file exist
if [ ! -f "/tmp/date.txt" ]; then
   echo 0 > /tmp/date.txt
fi

#calculate time difference
read olddate < /tmp/date.txt
date="$(date +%s)"
diff="$(echo "$date - $olddate" | bc)"

#If 3600 is past, execute the first command, else other
if [ "$diff" -gt 3600 ]; then
   printf "%s\n" "$aprsauth" "$data" | ncat --send-only $server $port #this is your QTH object from the first script
   printf "%s\n" "$aprsauth" "$t1" "$t2" "$t3" "$t4" "$t5" | ncat --send-only $server $port 
   echo "$date" > /tmp/date.txt
else
   printf "%s\n" "$aprsauth" "$t1" | ncat --send-only $server $port
fi
#Write the last sequence number.
echo "$num" > /tmp/sequence_number.txt

Telemetry should form on aprs.fi, for example: https://aprs.fi/telemetry/a/S55MA-10
Note, formatting in script might be broken due html formatting, here is a raw script: https://pastebin.com/24CaMXLT

Main apps needed:
– WxToImg
– Predict
– Rtl-SDR
– Sox
– Dropbox bash uploader
– Some essential packages
– A script to link it all together, provided by a reddit user the2belo. Check out the sources at the bottom of this post.

apt-get update
apt-get install curl git-core git cmake at predict sox libusb-1.0-0-devx-fmt-all build-essential libasound-dev libpulse-dev -y
cat <<EOF >no-rtl.conf
blacklist dvb_usb_rtl28xxu
blacklist rtl2832
blacklist rtl2830
EOF
mv no-rtl.conf /etc/modprobe.d/
git clone git://git.osmocom.org/rtl-sdr.gi
cd rtl-sdr/
mkdir build
cd build
cmake ../ -DINSTALL_UDEV_RULES=ON
make
make install
ldconfig
cd ~
cp ./rtl-sdr/rtl-sdr.rules /etc/udev/rules.d/
reboot
rtl_test

Output should look similar to this:
root@rpi:~/wxsat# rtl_test
Found 1 device(s):
0: Realtek, RTL2838UHIDIR, SN: 00000001

Using device 0: Generic RTL2832U OEM
Found Rafael Micro R820T tuner
Supported gain values (29): 0.0 0.9 1.4 2.7 3.7 7.7 8.7 12.5 14.4 15.7 16.6 19.7 20.7 22.9 25.4 28.0 29.7 32.8 33.8 36.4 37.2 38.6 40.2 42.1 43.4 43.9 44.5 48.0 49.6
[R82XX] PLL not locked!
Sampling at 2048000 S/s.

Info: This tool will continuously read from the device, and report if
samples get lost. If you observe no further output, everything is fine.

Reading samples in async mode…

wget http://www.wxtoimg.com/beta/wxtoimg-armhf-2.11.2-beta.deb
dpkg -i wxtoimg-armhf-2.11.2-beta.deb
wxtoimg

Accept.

predict

Setup your QTH.

cd ~
mkdir wxsat
wget https://raw.githubusercontent.com/the2belo/wxsat-scheduler/master/noaa-scheduler.sh
chmod +x noaa-scheduler.sh
mkdir images recordings

Edit noaa-scheduler.sh to reflect your location.

Change -L parameter
/usr/local/bin/wxmap -T “NOAA ${bird}” -H ~/wxsat/weather.txt -L “35.47/136.76/20” -p0 -o “\$mapdate” ~/wxsat/noaa${bird}map.png

Format is: (lat/lon/alt meters)
Use this site to get lat and lon for your location http://www.latlong.net/lat-long-dms.html

Edit noaa-scheduler.sh for gain and SDR dongle ppm correction:

timeout $rectime /usr/local/bin/rtl_fm -d 0 -f ${freq}M -s 48000 -g 44.5 -p 1 -F 9 -A fast -E DC ~/wxsat/recordings/NOAA${bird}-\$recdate.raw

-g = gain

-p = ppm

Play with gain settings to get the best results.

You also need to add the timezone for the script, add

export TZ='UTC date'

in a new line after #!/bin/bash and after cat << EOF > ~/wxsat/noaa${bird}.at

This is how it looks like in a final version: https://pastebin.com/3uWcp9wi

Script generates MCIR and HCVT images by default, you can change this options. I also added -c option to crop telemetry from the sides of the pictures.

/usr/local/bin/wxtoimg -c -e MCIR -m ~/wxsat/noaa${bird}map.png ~/wxsat/recordings/NOAA${bird}-\$recdate.wav ~/wxsat/images/NOAA${bird}-MCIR-\$recdate.png

mkdir Dropbox-Uploader
cd Dropbox-Uploader
curl "https://raw.githubusercontent.com/andreafabrizi/Dropbox-Uploader/master/dropbox_uploader.sh" -o dropbox_uploader.sh
chmod +x dropbox_uploader.sh
./dropbox_uploader.sh

Follow the instructions.

Automate the proces. Commands bellow will be run every 12 hours.

crontab -e

00 */12 * * * atq | awk ‘{print $1}’ | sort -n | xargs atrm
01 */12 * * * ~/wxsat/noaa-scheduler.sh 15 137.620
02 */12 * * * ~/wxsat/noaa-scheduler.sh 18 137.9125
03 */12 * * * ~/wxsat/noaa-scheduler.sh 19 137.100
00 */12 * * * wget -qr https://www.celestrak.com/NORAD/elements/weather.txt -O ~/wxsat/weather.txt

Start the jobs immediately:

wget -qr https://www.celestrak.com/NORAD/elements/weather.txt -O ~/wxsat/weather.txt
~/wxsat/noaa-scheduler.sh 15 137.620
~/wxsat/noaa-scheduler.sh 18 137.9125
~/wxsat/noaa-scheduler.sh 19 137.100

If you are going to change the file noaa-scheduler.sh, you need to kill the existing jobs and restart them. Kill the jobs with:

atq | awk '{print $1}' | sort -n | xargs atrm

Sources:
https://www.reddit.com/r/RTLSDR/comments/5iuzbl/fully_automated_raspberry_pi_noaa_satellite/
https://gist.github.com/floehopper/99a0c8931f9d779b0998
https://github.com/the2belo/wxsat-scheduler

There is another piece of software to automatically receive NOAA and Meteor satellites, I have yet to check it out.

Link: https://github.com/cyber-atomus/autowx

Enable I2C with raspi-config and reboot

Check if the sensor is connected:

i2cdetect -y 1

The output should look like this:

root@rpikiosk:~# i2cdetect -y 1
     0  1  2  3  4  5  6  7  8  9  a  b  c  d  e  f
00:          -- -- -- -- -- -- -- -- -- -- -- -- --
10: -- -- -- -- -- -- -- -- -- -- -- -- -- -- -- --
20: -- -- -- 23 -- -- -- -- -- -- -- -- -- -- -- --
30: -- -- -- -- -- -- -- -- -- -- -- -- -- -- -- --
40: 40 -- -- -- -- -- -- -- -- -- -- -- -- -- -- --
50: -- -- -- -- -- -- -- -- -- -- -- -- -- -- -- --
60: -- -- -- -- -- -- -- -- -- -- -- -- -- -- -- --
70: -- -- -- -- -- -- -- 77

Our HTU21D device is detected as the number 40 in the line 40, so the address is 0X40.

#!/usr/bin/python
import struct, array, time, io, fcntl

I2C_SLAVE=0x0703
HTU21D_ADDR = 0x40
CMD_READ_TEMP_HOLD = "\xE3"
CMD_READ_HUM_HOLD = "\xE5"
CMD_READ_TEMP_NOHOLD = "\xF3"
CMD_READ_HUM_NOHOLD = "\xF5"
CMD_WRITE_USER_REG = "\xE6"
CMD_READ_USER_REG = "\xE7"
CMD_SOFT_RESET= "\xFE"

class i2c(object):
   def __init__(self, device, bus):

      self.fr = io.open("/dev/i2c-"+str(bus), "rb", buffering=0)
      self.fw = io.open("/dev/i2c-"+str(bus), "wb", buffering=0)

      # set device address

      fcntl.ioctl(self.fr, I2C_SLAVE, device)
      fcntl.ioctl(self.fw, I2C_SLAVE, device)

   def write(self, bytes):
      self.fw.write(bytes)

   def read(self, bytes):
      return self.fr.read(bytes)

   def close(self):
      self.fw.close()
      self.fr.close()

class HTU21D(object):
   def __init__(self):
      self.dev = i2c(HTU21D_ADDR, 1) #HTU21D 0x40, bus 1
      self.dev.write(CMD_SOFT_RESET) #soft reset
      time.sleep(.1)

   def ctemp(self, sensorTemp):
      tSensorTemp = sensorTemp / 65536.0
      return -46.85 + (175.72 * tSensorTemp)

   def chumid(self, sensorHumid):
      tSensorHumid = sensorHumid / 65536.0
      return -6.0 + (125.0 * tSensorHumid)

   def crc8check(self, value):
      # Ported from Sparkfun Arduino HTU21D Library: https://github.com/sparkfun/HTU21D_Breakout
      remainder = ( ( value[0] << 8 ) + value[1] ) << 8
      remainder |= value[2]
      
      # POLYNOMIAL = 0x0131 = x^8 + x^5 + x^4 + 1
      # divsor = 0x988000 is the 0x0131 polynomial shifted to farthest left of three bytes
      divsor = 0x988000
      
      for i in range(0, 16):
         if( remainder & 1 << (23 - i) ): remainder ^= divsor divsor = divsor >> 1
      
      if remainder == 0:
         return True
      else:
         return False
   
   def read_tmperature(self):
      self.dev.write(CMD_READ_TEMP_NOHOLD) #measure temp
      time.sleep(.1)

      data = self.dev.read(3)
      buf = array.array('B', data)

      if self.crc8check(buf):
         temp = (buf[0] << 8 | buf [1]) & 0xFFFC
         return self.ctemp(temp)
      else:
         return -255
         
   def read_humidity(self):
      self.dev.write(CMD_READ_HUM_NOHOLD) #measure humidity
      time.sleep(.1)

      data = self.dev.read(3)
      buf = array.array('B', data)
      
      if self.crc8check(buf):
         humid = (buf[0] << 8 | buf [1]) & 0xFFFC
         return self.chumid(humid)
      else:
         return -255
         
if __name__ == "__main__":
   obj = HTU21D()
   print "Temp:", obj.read_tmperature(), "C"
   print "Humid:", obj.read_humidity(), "% rH"

Run the script:

root@rpikiosk:~# ./HTU21DF.py
Temp: 22.9382104492 C
Humid: 45.0101318359 % rH

If you connect the ground wire to the wrong Rpi pin, you’ll get this error:

IOError: [Errno 5] Input/output error


My 5V RaspberryPi fan was very loud and annoying, so I wanted a solution to regulate the fan depending on the Pi temperature.

To achieve that, I used a mosfet switch, pulled out from an old computer motherboard, followed by some easy bash scripting.

Almost any mosfet from an old computer motherboard should work.

motherboard_mosfet

Wiring:

mosfet_fan_schematics

You can use any not used GPIO to connect the gate pin, in the picture above it’s #23.

mosfet_fan_schematics2

I connected the mosfet pin to GPIO 19 in my case. You can choose  your own.

Software:

sudo apt-get update
sudo apt-get install bc

Enable selected GPIO pin, In my case, GPIO 19

echo "19" > /sys/class/gpio/export
echo "out" > /sys/class/gpio/gpio19/direction

If you wan’t to select another GPIO and you already exported one GPIO, you need to unexport previous GPIO.

echo "19" > /sys/class/gpio/unexport

Bash script for controlling fan “speed”:

pico rpipwm.sh

Paste the script bellow, edit your GPIO pin and save:

#!/bin/bash
#Poor man's PWM
#16.11.2015 by S55MA
#Quick and dirty script for controlling fan speed on RaspberryPI
#No rights reserved

#Define GPIO pin
pin="19"

while true; do

#Read temp
temp=$(cat /sys/class/thermal/thermal_zone0/temp | awk 'NR == 1 { print $1 / 1000}' | cut -c -4)

#If temperature is equal or lower than 39.99, the fan will stop spinning
if [[ $(bc <<< "$temp <= 39.99") == 1 ]] ;
then
$(echo "0" > /sys/class/gpio/gpio$pin/value)
fi

#If temperature is between 40 and 42.99, the fan will start with 1 second burst and 1 second sleep
if [[ $(bc <<< "$temp >= 40 && $temp <= 42.99") == 1 ]] ;
then
$(echo "1" > /sys/class/gpio/gpio$pin/value; sleep 1; echo "0" > /sys/class/gpio/gpio$pin/value; sleep 1)
fi

#If temperature is between 43 and 47.99, the fan will start with 1 second burst and 0.5 second sleep
if [[ $(bc <<< "$temp > 43 && $temp <= 47.99") == 1 ]] ;
then
$(echo "1" > /sys/class/gpio/gpio$pin/value; sleep 1; echo "0" > /sys/class/gpio/gpio$pin/value; sleep 0.5)
fi

#If temperature is equal or higher than 48, the fan will start spinning constantly
if [[ $(bc <<< "$temp >= 48") == 1 ]] ;
then
$(echo "1" > /sys/class/gpio/gpio$pin/value)
fi
sleep 0.1
done
chmod +x rpipwm.sh
./rpipwm.sh

Enable auto start at boot:

sudo cp rpipwm.sh /etc/init.d/rpipwm.sh
sudo chmod +x /etc/init.d/rpipwm.sh
sudo update-rc.d /etc/init.d/rpipwm.sh defaults

or you can use crontab:

crontab -e

Add and save:

@reboot /path/to/script/rpipwm.sh
sudo update-rc.d cron defaults

The rpisystat script will report the following system parameters to your LCD:

  • Internal IP
  • External IP
  • CPU temperature
  • GPU temperature
  • CPU usage
  • Memory usage
  • Free disk space
  • Incoming and outgoing network traffic

You need:

1. Breadboard with T-Cobbler (or connect the wires directly)
2. 16×2 LCD board
3. Adjustable resistor (potentiometer) for adjusting LCD contrast

1. Wiring (source: https://learn.adafruit.com/drive-a-16×2-lcd-directly-with-a-raspberry-pi/wiring):

Pin #1 of the LCD goes to ground (black wire)
Pin #2 of the LCD goes to +5V (red wire)
Pin #3 (Vo) connects to the middle of the potentiometer (orange wire)
Pin #4 (RS) connects to the Cobbler #25 (yellow wire)
Pin #5 (RW) goes to ground (black wire)
Pin #6 (EN) connects to Cobbler #24 (green wire)
Skip LCD Pins #7, #8, #9 and #10
Pin #11 (D4) connects to cobbler #23 (blue wire)
Pin #12 (D5) connects to Cobbler #17 (violet wire)
Pin #13 (D6) connects to Cobber #21 (gray wire)
Pin #14 (D7) connects to Cobber #22 (white wire)
Pin #15 (LED +) goes to +5V (red wire)
Pin #16 (LED -) goes to ground (black wire)

raspberry_pi_pi-char-lcd

This schematics is for RaspberryPi 1 version, but you can connect to the same pins on RaspberryPi 2 (picture bellow).

16x2_lcd_display_rpi2

2. Software

Download required packages:

sudo apt-get update
sudo apt-get install python-dev python-setuptools python-pip git
sudo easy_install -U distribute
sudo pip install rpi.gpio

Download my scripts:

sudo git clone git://github.com/s55ma/16-2-LCD-rpisystat.git
cd 16-2-LCD-rpisystat
sudo ./rpisystat.py

Make sure you edit rpisystat.py to match your GPIO pins (default is for the wiring above). Also edit rx.sh and tx.sh to match your network adapter.

Check the display in action: https://www.youtube.com/watch?v=5YkLTBd5-bw

Scripts: https://github.com/s55ma/16-2-LCD-rpisystat

References: https://learn.adafruit.com/drive-a-16×2-lcd-directly-with-a-raspberry-pi/wiring

In my previous post, I was writting about how to graph temperature and humidity from AM2302 sensor on RasberryPi. In addition, we will add dewpoint monitoring. We need two variables to calculate dewpoint, temperature and humidity. I took some already made scripts and combined them together to fit my needs. I wanted to calculate dewpoint completely with bash and bc, but since I’m to lazy, I just used the python script from this blog.

Get to the root shell (we don’t want to type sudo everytime):

sudo -s

Create python script (for dewpoint calculations):

pico /opt/dewpoint.py

Paste the code, save and exit (CTRL + C), Y, ENTER

import sys
import numpy as np

# approximation valid for
# 0 degC < T < 60 degC
# 1% < RH < 100%
# 0 degC < Td < 50 degC

# constants
a = 17.271
b = 237.7 # degC

# sys.argv[0] is program name
T=float(sys.argv[1])
RH=float(sys.argv[2])


def dewpoint_approximation(T,RH):

    Td = (b * gamma(T,RH)) / (a - gamma(T,RH))

    return Td


def gamma(T,RH):

    g = (a * T / (b + T)) + np.log(RH/100.0)

    return g


Td = dewpoint_approximation(T,RH)
print Td

Make the script executable:

chmod +x /opt/dewpoint.py

Create plugin file:

pico /etc/munin/plugins/dewpoint

Paste the code, save and exit (CTRL + C), Y, ENTER

#!/bin/sh

case $1 in
config)
cat <<'EOM'
graph_title Dewpoint
graph_vlabel Celsius
graph_category AM2302
dewpoint.label Temperature
dewpoint.draw AREASTACK
dewpoint.colour 403075
EOM
exit 0;;
esac

humidity=$(/opt/lol_dht22/loldht 7 | grep -i "humidity" | cut -d ' ' -f3)
temperature=$(/opt/lol_dht22/loldht 7 | grep -i "temperature" | cut -d ' ' -f7)

printf "dewpoint.value "
python /opt/dewpoint.py $temperature $humidity
chmod +x /etc/munin/plugins/dewpoint

Open munin-node file:

pico /etc/munin/plugin-conf.d/munin-node

Add the line at the end of the file, save and exit:

[dewpoint*]

Restart services:

munin-node-configure
/etc/init.d/munin-node restart

20151021_150632

Hardware:

  • RasberryPi 2
  • AM2302 humidity/temperature sensor
  • Some wires from old PCs to connect sensor with RaspberryPi

Software:

  • Raspbian OS
  • Nginx
  • Munin
  • WiringPi
  • Lol_dht22

1. Solder wires to the sensor like on the picture above, and connect them to the correct pins:

Pin 1 on the AM2302 to pin 1 (+3.3V) on the GPIO connector (labeled P1 on the raspi)
Pin 2 on the AM2302 to pin 7 (GPIO 4) on the GPIO connector
Pin 4 on the AM2302 to pin 9 (Ground) on the GPIO connector

For detailed instructions, check this blog up to step 4: https://hackaday.io/project/3766/instructions

All shell commands will be run as root, so I will not use sudo.

2. Install Nginx (web server)

apt-get update
apt-get install nginx php5-fpm

3. Install Munin

Muning is a monitoring tool for sysadmins. It creates graphs to monitor various parameters. We will configure munin to display AM2302 sensor in graphs.

apt-get install munin munin-node munin-plugins-extra

Edit munin configuration file:

pico /etc/munin/munin.conf
[server.name]
 address 127.0.0.1
 use_node_name yes

4. Configure Nginx virtual host. Dynazoom will work with this config.

pico /etc/nginx/sites-enabled/default or pico /etc/nginx/sites-enabled/your.domain.com
server {
        listen 443 ssl;
        ssl_certificate /etc/nginx/ssl/your.domain.com.crt;
        ssl_certificate_key /etc/nginx/ssl/your.domain.com.key;
        server_name your.domain.com;
        root "/var/cache/munin/www/";
        auth_basic            "Private access";
        auth_basic_user_file  /etc/munin/munin_htpasswd;

        location ^~ /munin-cgi/munin-cgi-graph/ {
                fastcgi_split_path_info ^(/munin-cgi/munin-cgi-graph)(.*);
                fastcgi_param PATH_INFO $fastcgi_path_info;
                fastcgi_pass unix:/var/run/munin/spawn-fcgi-munin-graph.sock;
                include fastcgi_params;
        }

        location /static/ {
                alias /etc/munin/static/;
        }
}

5. Generate SSL cert

mkdir /etc/nginx/ssl
openssl req -subj '/CN=your.domain.com' -x509 -nodes -days 365 -newkey rsa:2048 -keyout /etc/nginx/ssl/your.domain.com.key -out /etc/nginx/ssl/your.domain.com.crt

6. Generate website password

apt-get install apache2-utils
htpasswd -c /etc/munin/munin_htpasswd admin

You will be promted to enter a new password.

7. Add common modules to munin

cd /usr/share/munin/plugins
wget -O pisense_ https://raw.github.com/perception101/pisense/master/pisense_
chmod a+x pisense_
ln -s /usr/share/munin/plugins/pisense_ /etc/munin/plugins/pisense_temp
ln -s /usr/share/munin/plugins/pisense_ /etc/munin/plugins/pisense_clock
pico /etc/munin/plugin-conf.d/munin-node
[pisense_*]
user root

8. Configure AM2302 prerequisites

apt-get install git-core
cd /opt/
git clone git://git.drogon.net/wiringPi
cd wiringPi
./build
cd /opt/
git clone https://github.com/technion/lol_dht22
cd lol_dht22
./configure
make

9. Create plugins for munin

pico /etc/munin/plugins/DHT22-humidity
#!/bin/sh

case $1 in
 config)
 cat <<'EOM'
graph_title Relative humidity
graph_vlabel Percent
graph_category AM2302
humidity.label RH
humidity.draw AREASTACK
humidity.colour 3E9BFB
EOM
 exit 0;;
esac

printf "humidity.value "
/opt/lol_dht22/loldht 7 | grep -i "humidity" | cut -d ' ' -f3
chmod +x /etc/munin/plugins/DHT22-humidity
pico /etc/munin/plugins/DHT22-temperature
#!/bin/sh

case $1 in
 config)
 cat <<'EOM'
graph_title Temperature
graph_vlabel Celsius
graph_category AM2302
temperature.label Celsius
temperature.label Temperature
temperature.draw AREASTACK
temperature.colour 00FF00
EOM
 exit 0;;
esac

printf "temperature.value "
/opt/lol_dht22/loldht 7 | grep -i "temperature" | cut -d ' ' -f7
chmod +x /etc/munin/plugins/DHT22-temperature
pico /etc/munin/plugin-conf.d/munin-node

Add this to the end of the file:

[DHT22-*]
user root

10. Enable Dynazoom for graphs

apt-get install spawn-fcgi libcgi-fast-perl
pico /etc/init.d/munin-fastcgi
#! /bin/sh

### BEGIN INIT INFO
# Provides: spawn-fcgi-munin-graph
# Required-Start: $all
# Required-Stop: $all
# Default-Start: 2 3 4 5
# Default-Stop: 0 1 6
# Description: starts FastCGI for Munin-Graph
### END INIT INFO
# --------------------------------------------------------------
# Munin-CGI-Graph Spawn-FCGI Startscript by Julien Schmidt
# eMail: munin-trac at julienschmidt.com
# www: http://www.julienschmidt.com
# --------------------------------------------------------------
# Install: 
# 1. Copy this file to /etc/init.d
# 2. Edit the variables below
# 3. run "update-rc.d spawn-fcgi-munin-graph defaults"
# --------------------------------------------------------------
# Special thanks for their help to:
# Frantisek Princ
# Jérôme Warnier
# --------------------------------------------------------------
# Last Update: 14. February 2013
#
# Please change the following variables:

PATH=/usr/local/sbin:/usr/local/bin:/sbin:/bin:/usr/sbin:/usr/bin
NAME=spawn-fcgi-munin-graph
PID_FILE=/var/run/munin/$NAME.pid
SOCK_FILE=/var/run/munin/$NAME.sock
SOCK_USER=www-data
FCGI_USER=www-data
FCGI_GROUP=www-data
FCGI_WORKERS=2
DAEMON=/usr/bin/spawn-fcgi
DAEMON_OPTS="-s $SOCK_FILE -F $FCGI_WORKERS -U $SOCK_USER -u $FCGI_USER -g $FCGI_GROUP -P $PID_FILE -- /usr/lib/munin/cgi/munin-cgi-graph"

# --------------------------------------------------------------
# No edits necessary beyond this line
# --------------------------------------------------------------

if [ ! -x $DAEMON ]; then
 echo "File not found or is not executable: $DAEMON!"
 exit 0
fi

status() {
 if [ ! -r $PID_FILE ]; then
 return 1
 fi
 
 for FCGI_PID in `cat $PID_FILE`; do 
 if [ -z "${FCGI_PID}" ]; then
 return 1
 fi
 
 FCGI_RUNNING=`ps -p ${FCGI_PID} | grep ${FCGI_PID}`
 if [ -z "${FCGI_RUNNING}" ]; then
 return 1
 fi
 done;
 
 return 0
}
 
start() {
 if status; then
 echo "FCGI is already running!"
 exit 1
 else
 $DAEMON $DAEMON_OPTS
 fi
}

stop () { 
 if ! status; then
 echo "No PID-file at $PID_FILE found or PID not valid. Maybe not running"
 exit 1
 fi
 
 # Kill processes
 for PID_RUNNING in `cat $PID_FILE`; do
 kill -9 $PID_RUNNING
 done
 
 # Remove PID-file
 rm -f $PID_FILE
 
 # Remove Sock-File
 rm -f $SOCK_FILE
}

case "$1" in
 start)
 echo "Starting $NAME: "
 start
 echo "... DONE"
 ;;

 stop)
 echo "Stopping $NAME: "
 stop
 echo "... DONE"
 ;;

 force-reload|restart)
 echo "Stopping $NAME: "
 stop
 echo "Starting $NAME: "
 start
 echo "... DONE"
 ;;
 
 status)
 if status; then
 echo "FCGI is RUNNING"
 else
 echo "FCGI is NOT RUNNING"
 fi
 ;;
 
 *)
 echo "Usage: $0 {start|stop|force-reload|restart|status}"
 exit 1
 ;;
esac

exit 0
chmod 755 /etc/init.d/munin-fastcgi
update-rc.d munin-fastcgi defaults
/etc/init.d/munin-fastcgi start

11. Restart daemons and visit your munin site

munin-node-configure

/etc/init.d/nginx restart

/etc/init.d/munin-node restart

Go to https://your.domain.com/munin/


Check how to add dewpoint graph on my next post.

References:


I used my RaspberryPI to setup an APRS digipeater. The software I used is called Xastir. The problem is, there are no good default maps to use in Xastir.

This tutorial will guide you how to install OSM maps into Xastir software. Maps are generated on a Windows machine, then transferred to a Linux machine where Xastir is running.

TL;DR version:

1. Download Taho application for Windows.

2. Select area, copy bbox text.

3. Paste bbox text to Taho, click on bbox button, select parameters and click on make maps.

4. Upload generated .inf and .jpg files to your Xastir map folder.

5. Download inf2geo.pl to your linux machine and convert .inf files to .geo files.

6. Start or restart Xastir, select your map and apply.


Detailed version:

1. Download Taho application for Windows (Version 4.01 didn’t work on my PC, you should download older versions, if you can’t run the newest version).

2. When you launch the Taho application, it will also open the bbox tool site.

3. On the bbox tool site, center map to your desired location and click button “select area”. Select your area.

Note: If you select too big area, you won’t be able too select top zoom levels in the next steps.

bboxtool

4. Copy code in the grey box to your clipboard.

greybox


5. Open Taho application and paste the code into “Get from <bbox…>” field. Click on the bbox button now. It should populate coordinates into Taho application. Select UI-View in Kal.-Files, .jpg for file type, zoom level (16 is good for small city), size (should be free, whole area in 1 file), define path for saving your maps and click on make maps button.

steps


6. Each selected zoom level generates separate .jpg and .inf files in your defined maps path (step above).

7. Xastir doesn’t know how to handle .inf files so we need to convert them to .geo format. Upload your .jpg and .inf files to Xastir map folder. In my case, maps are located in  /usr/share/xastir/maps Fire up your linux console and

Download inf2geo.pl converter and convert .inf files:

sudo cd /usr/share/xastir/scripts
sudo wget https://raw.githubusercontent.com/mgrennan/xastir/master/scripts/inf2geo.pl
sudo chmod +x inf2geo.pl
sudo ./inf2geo.pl /usr/share/xastir/maps/yourmap.inf

By now, you should have yourmap.geo file in /usr/share/xastir/maps
Open .geo file with your favourite editor and correct the path if you have to.

FILENAME    maps/yourmap.jpg
TIEPOINT    0           0       16.0645 45.8288333333333
TIEPOINT    5631        5887    14.661666666667        46.8525
IMAGESIZE   5632        5888
#5632x5888
#
# Converted from a .INF file by WE7U's inf2geo.pl script
#

Note: If you change the name of the file, you also have to change FILENAME in yourmap.geo accordingly.

8. Start or restart Xastir, go to Map -> Map Chooser -> select your map -> Apply -> profit.

My original post is at: https://troubleshoot-coltpython.blogspot.com/2013/11/measuring-raspberrypi-cpu-and-gpu.html

We’ll create a bash script:

sudo nano temp.sh

Paste this and save:

#!/bin/bash cpuTemp0=$(cat /sys/class/thermal/thermal_zone0/temp) cpuTemp1=$(($cpuTemp0/1000)) cpuTemp2=$(($cpuTemp0/100)) cpuTempM=$(($cpuTemp2 % $cpuTemp1)) cpuFreq=`cat /sys/devices/system/cpu/cpu0/cpufreq/scaling_cur_freq | sed 's/.\{3\}$//'`Mhz echo CPU temp"="$cpuTemp1"."$cpuTempM"'C" echo GPU $(/opt/vc/bin/vcgencmd measure_temp) echo CPU frequency=$cpuFreq

Set permission and run it:

sudo chmod +x temp.sh;./temp.sh

Duplicate of original post: https://troubleshoot-coltpython.blogspot.com/2013/11/phpsysinfo-loading-slow-on-raspberrypi.html

Default installation of PhpSysInfo on RaspberryPI takes a long time to load due some missing programs and hardware components.

My system info:


Hardware: RaspberryPI Model B with 512MB RAM

OS: Raspbian GNU/Linux 7

Nginx version: 1.2.1-2.2+wheezy1

PHP version: 5.4.4-14+deb7u5

PhpSysInfo version: 3.0.17-1

Enable debug mode in /etc/phpsysinfo/config.php

define('PSI_DEBUG', true);

Open http://yoursitephpsysinfo/xml.php

I found the following errors:

<Error Function="find_program(lsb_release)">

<![CDATA[

program not found on the machine ./xml.php on line 45 ./includes/output/class.WebpageXML.inc.php on line 138 in function run() ./includes/xml/class.XML.inc.php on line 456 in function getXml() ./includes/xml/class.XML.inc.php on line 435 in function _buildXml() ./includes/os/class.OS.inc.php on line 70 in function getSys() ./includes/os/class.Linux.inc.php on line 576 in function build() ./includes/os/class.Linux.inc.php on line 527 in function _distro() ./includes/class.CommonFunctions.inc.php on line 117 in function executeProgram( "lsb_release", "-a 2>/dev/null", "", true )

]]>

</Error>

<Error Function="/usr/bin/lspci">

<![CDATA[

pcilib: Cannot open /proc/bus/pci lspci: Cannot find any working access method. Return value: 1 ./xml.php on line 45 ./includes/output/class.WebpageXML.inc.php on line 138 in function run() ./includes/xml/class.XML.inc.php on line 456 in function getXml() ./includes/xml/class.XML.inc.php on line 435 in function _buildXml() ./includes/os/class.OS.inc.php on line 70 in function getSys() ./includes/os/class.Linux.inc.php on line 583 in function build() ./includes/os/class.Linux.inc.php on line 306 in function _pci() ./includes/class.Parser.inc.php on line 36 in function lspci() ./includes/class.CommonFunctions.inc.php on line 142 in function executeProgram( "lspci", "", "", true )

]]>

</Error>

<Error Function="find_program(lsscsi)">

<![CDATA[

program not found on the machine ./xml.php on line 45 ./includes/output/class.WebpageXML.inc.php on line 138 in function run() ./includes/xml/class.XML.inc.php on line 456 in function getXml() ./includes/xml/class.XML.inc.php on line 435 in function _buildXml() ./includes/os/class.OS.inc.php on line 70 in function getSys() ./includes/os/class.Linux.inc.php on line 585 in function build() ./includes/os/class.Linux.inc.php on line 367 in function _scsi() ./includes/class.CommonFunctions.inc.php on line 117 in function executeProgram( "lsscsi", "-c", "", true )

]]>

</Error>

<Error Function="file_exists(/proc/scsi/scsi)">

<![CDATA[

the file does not exist on your machine ./xml.php on line 45 ./includes/output/class.WebpageXML.inc.php on line 138 in function run() ./includes/xml/class.XML.inc.php on line 456 in function getXml() ./includes/xml/class.XML.inc.php on line 435 in function _buildXml() ./includes/os/class.OS.inc.php on line 70 in function getSys() ./includes/os/class.Linux.inc.php on line 585 in function build() ./includes/os/class.Linux.inc.php on line 367 in function _scsi() ./includes/class.CommonFunctions.inc.php on line 191 in function rfts( "/proc/scsi/scsi", "", 0, 4096, true )

]]>

</Error>

First, third and fourth error are because some programs are not present on the system, let’s install them.

sudo apt-get install lsb-release lsscsi -y

Second error is due missing PCI bus on raspberryPI.

# lspci

pcilib: Cannot open /proc/bus/pci

lspci: Cannot find any working access method.

We can’t do anything about that but disable that function in PhpSysInfo PHP code. Open the file/your/path/to/phpsyinfo/includes/class.Parser.inc.php and find the lspci function.

/**

     * parsing the output of lspci command

     *

     * @return Array

     */

    public static function lspci()

        {

        $arrResults = array();

        if (CommonFunctions::executeProgram("lspci", "", $strBuf, PSI_DEBUG)) {

            $arrLines = preg_split("/\n/", $strBuf, -1, PREG_SPLIT_NO_EMPTY);

            foreach ($arrLines as $strLine) {

                list($strAddr, $strName) = preg_split('/ /', trim($strLine), 2);

                $strName = preg_replace('/\(.*\)/', '', $strName);

                $dev = new HWDevice();

                $dev->setName($strName);

                $arrResults[] = $dev;

            }

        }

        return $arrResults;

    }

Change the code above to match the one bellow:

/**

     * parsing the output of lspci command

     *

     * @return Array

     */

    public static function lspci()

        {

        return array();

            $arrResults = array();

        if (CommonFunctions::executeProgram("lspci", "", $strBuf, PSI_DEBUG)) {

            $arrLines = preg_split("/\n/", $strBuf, -1, PREG_SPLIT_NO_EMPTY);

            foreach ($arrLines as $strLine) {

                list($strAddr, $strName) = preg_split('/ /', trim($strLine), 2);

                $strName = preg_replace('/\(.*\)/', '', $strName);

                $dev = new HWDevice();

                $dev->setName($strName);

                $arrResults[] = $dev;

            }

        }

        return $arrResults;

    }

Disable debug mode in phpsysinfo config, save, reload, drink beer.