We are going to install Cisco wireless virtual controller on Proxmox hypervisor and connect it to pfSense router.
Prerequisites:
- pfSense router with required VLANS created and tagged to Proxmox (I will not cover how to setup VLANs on pfSense)
- VLAN capable switch
- Cisco access point
- Proxmox hypervisor
- vWLC iso file (you can get it from Cisco support site if you have a service contract, otherwise search the internet, hint: torrents (CTVM)). Check your access points models and see which vWLC supports your access points. In my case, I want to support some older APs so I installed version 8.3.150. I recommend you to install 8.5.x.
1. Create a new virtual machine in Proxmox
vWLC requires two network interfaces, one for management and one for out of band (OOB) service port. Management interface has to be a trunk (tagged) port (carrying multiple vlans). Service port has to be an access port only (untagged). Let’s say we will use VLAN 20 for management, VLAN 200 for service ports and VLAN 21 for wifi users. Before creating interfaces in vWLC virtual machine, make sure your Proxmox bridges are VLAN aware.

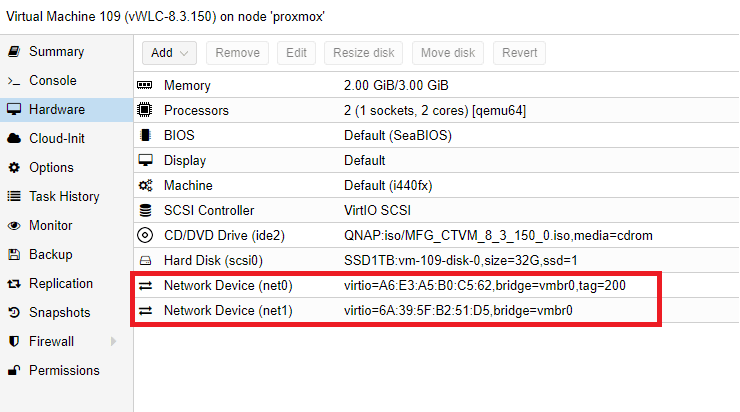
2. Create a new VM and add two interfaces.
First interface should be tagged with service-port VLAN, in my case VLAN 200. The second interface should have no tag, that means it’s a trunk port (it can carry multiple VLANS).
3. Start up newly created VM with loaded vWLC ISO and begin installation
You will be asked to enter:
– service port interface IP (you can use DHCP or static, this is a tagged/access port interface, with VLAN 200 in my case)
– management interface IP (this is a trunk interface, but it will ask you for a vlan tag that will become native vlan for this interface … Tag it, in my case VLAN 20, it needs to be static IP address, set it to IP address scheme that reflects your VLAN, in my case VLAN 20)
– NTP server
– credentials
After installation is complete, you should be able to access vWLC webGUI via https://management_interface_IP_on_VLAN20
4. Access point provisioning, DHCP option 43
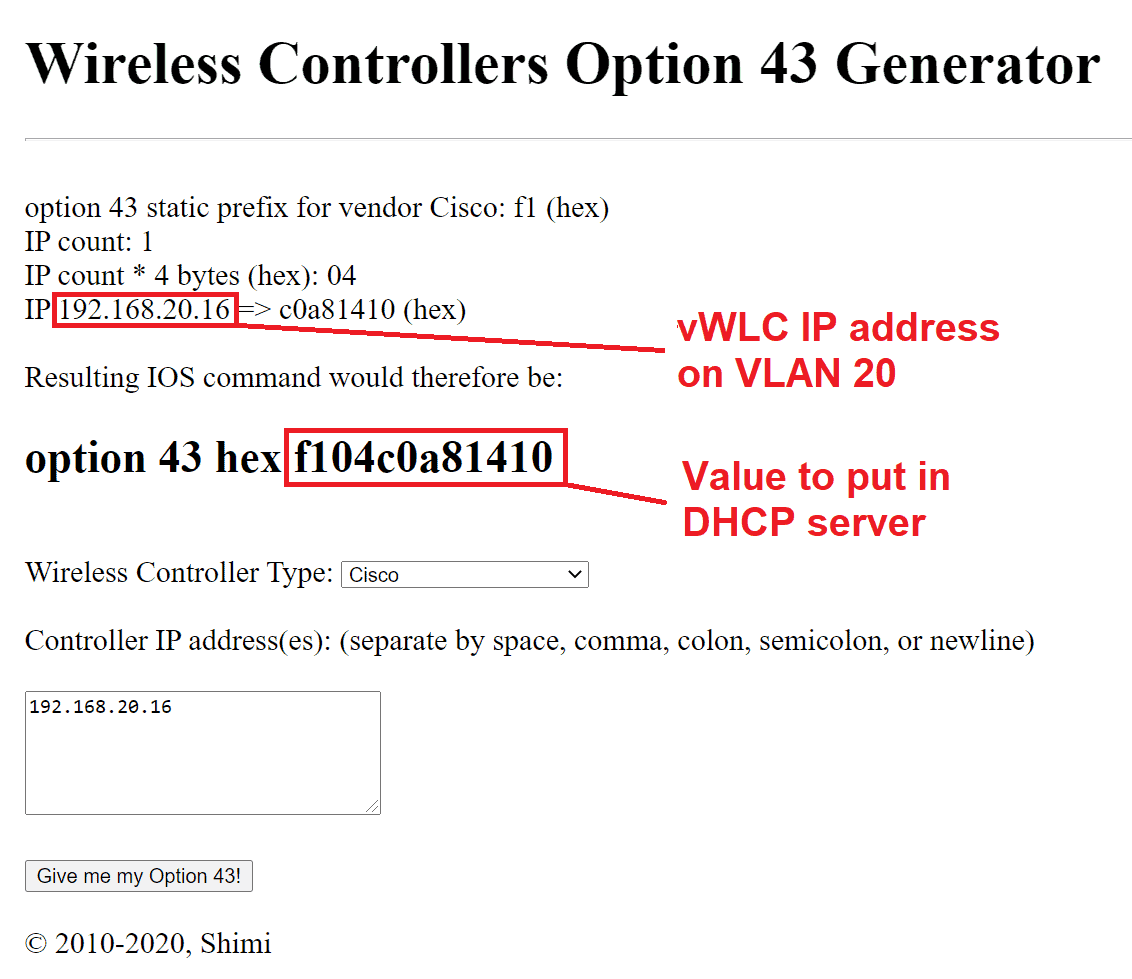
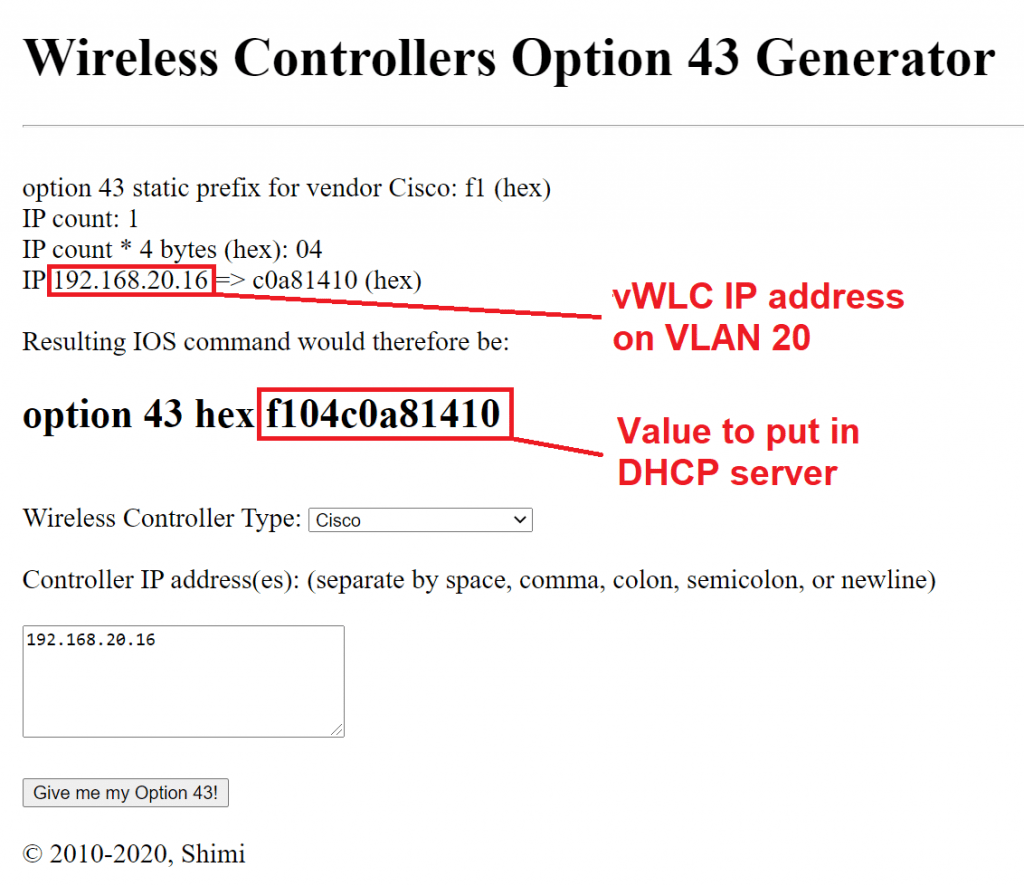
It will happen on management interface vlan, in my case VLAN 20. APs will need to know the IP of the vWLC controller, so we need to setup option 43 in our DHCP server that’s running on pfSense. Option 43 will tell access point the IP of the vWLC controller. You can help yourself with an option 43 generator (https://shimi.net/services/opt43/). More detailed guide from Cisco concerning option 43 is here: https://community.cisco.com/t5/wireless-mobility-documents/configuring-dhcp-option-43-and-option-60/ta-p/3143572
Optionally, you can also add option 60 (VCI – Vendor Class Identifier). You can get APs VCIs here: https://www.cisco.com/c/en/us/support/docs/wireless-mobility/wireless-lan-wlan/97066-dhcp-option-43-00.html#anc5
Go to pfSense -> Services -> DHCP Server -> VLAN20 -> Additional BOOTP/DHCP Options -> Display Advanced
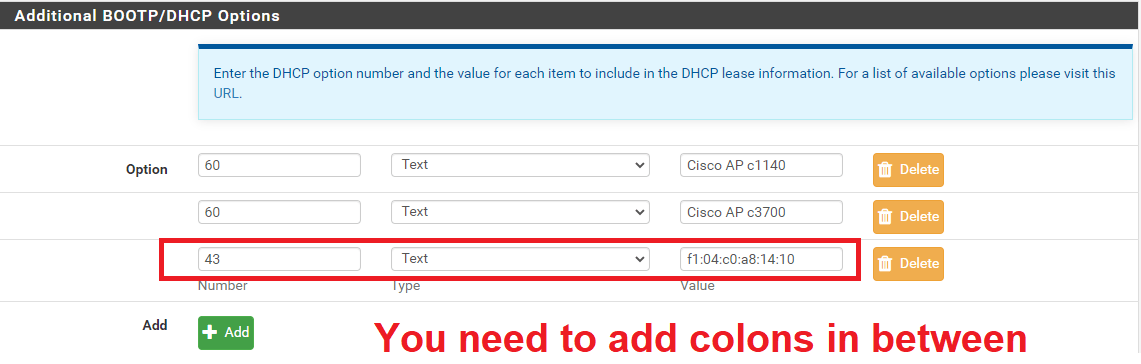
Save and apply changes.
EDIT: option 43 should be type string, not text!
5. Switch settings
vWLC supports only Flexconnect mode, that means you need to setup your switch ports (where APs will be connected to it) as a trunk port and setup a native VLAN. For non Cisco terms: untagged + tagged ports. Native VLAN should be the same as management interface, in my case VLAN 20. Trunk should also carry VLAN 21 for wifi clients.
Example for cisco:
interface GigabitEthernet1/0/1
switchport trunk native vlan 20
switchport trunk allowed vlan 20,21
switchport mode trunk
Other vendors have tagging and untagging, so VLAN 20 untagged, VLAN 21 tagged.
6. Connect AP to configured switch port
Connect AP to the switch and wait a few minutes to join the controller. If AP doesn’t join, check logs on WLC controller: MANAGEMENT -> Logs -> Message logs
If you get: (5246) Regulatory Domain Mismatch
Means you have to change country code to match the AP (usually US):
Shutdown radios first:
WLC GUI -> Wireless -> 802.11a/n/ac -> Network -> 802.11a Network Status (untick Enabled and apply)
WLC GUI -> Wireless -> 802.11b/g/n -> Network -> 802.11a Network Status (untick Enabled and apply)
Change country:
WLC GUI -> WIRELESS -> Country -> Tick US and apply
Reenable radios now.
Sometimes AP still won’t join, especially old ones. If you connect AP to a console cable and watch a console, you might get someting like:
*Oct 7 18:44:58.000: %CAPWAP-5-DTLSREQSEND: DTLS connection request sent peer_ip: 192.168.20.16 peer_port: 5246
*Oct 7 18:44:58.477: %DTLS-5-ALERT: Received FATAL : Certificate unknown alert from 192.168.20.16
*Oct 7 18:44:58.477: %DTLS-5-SEND_ALERT: Send FATAL : Close notify Alert to 192.168.20.16:5246
This means the certs on AP are expired. You can disable this by SSH into vWLC controller and enter the following commands:
config ap cert-expiry-ignore mic enable
config ap cert-expiry-ignore ssc enable
7. Enable SSID broadcasting
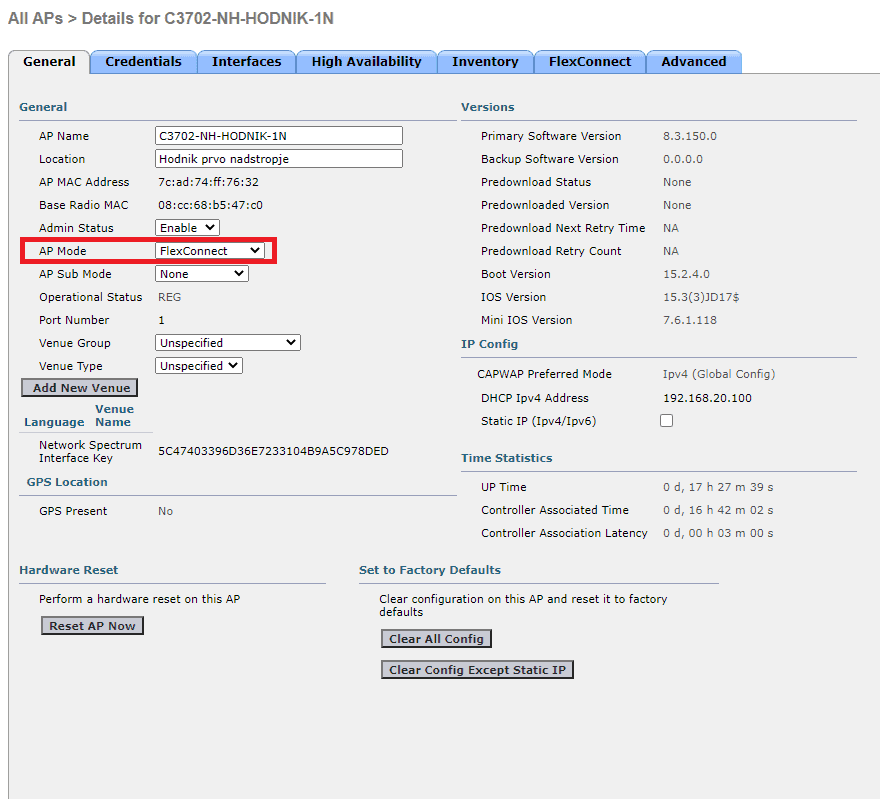
vWLC supports only Flexconnect, so we need to enable it:
Go to WLC GUI -> WIRELESS -> Access Points -> All APs -> select AP from the list -> AP Mode -> FlexConnect and apply
8. Create wireless network
First you need to create VLAN interface for wifi clients.
Go to WLC GUI -> Controller -> Interfaces -> New -> Interface name: vlan21 -> VLAN Id: 21 -> Apply
Now create WLAN network
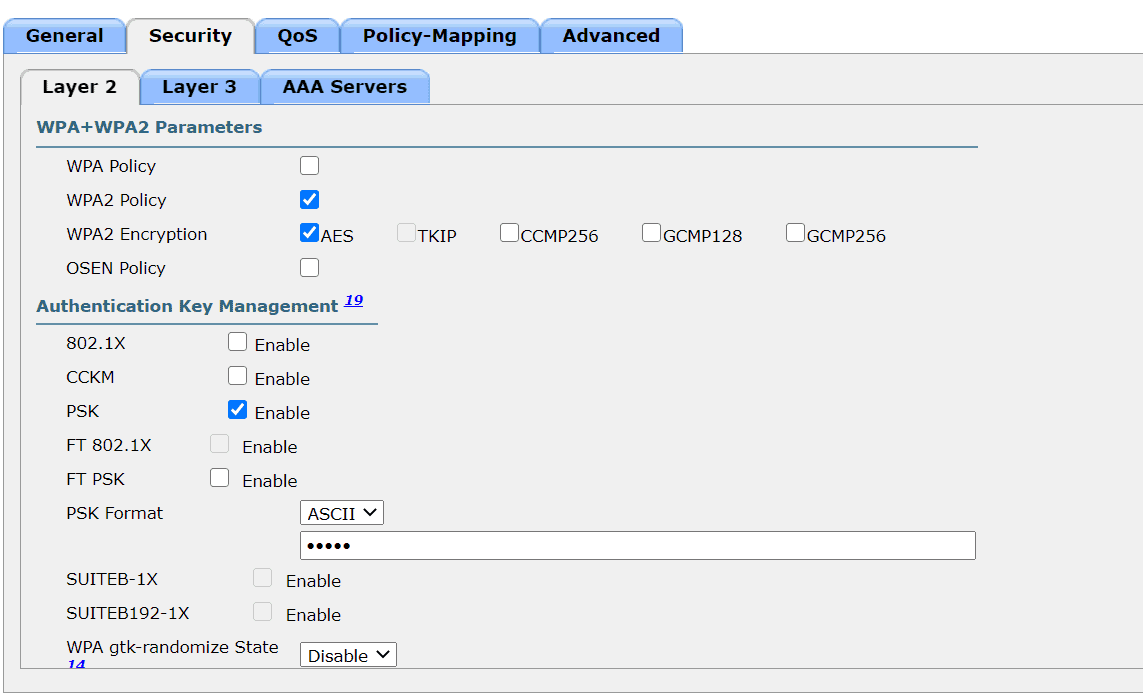
Go to WLC GUI -> WLANs -> Create new -> Enter Profile Name and SSID -> tick Status enabled and select Interface/Interface Group(G) vlan21 -> go to Security -> Layer 2 -> scroll down -> tick PSK Enable and create a wifi password -> Apply
9. Enable VLANs on AP
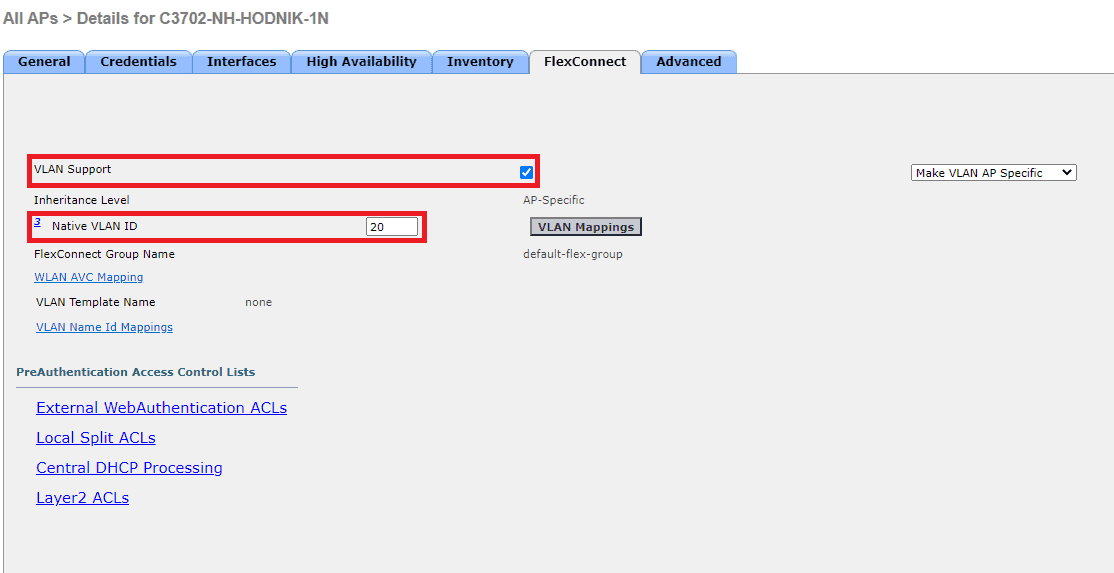
You need to setup native VLAN (in my case VLAN 20) on APs and add WLAN-VLAN mappings.
Go to WLC GUI -> WIRELESS -> Access Points -> All APs -> select AP from the list -> FlexConnect, tick VLAN support and enter native VLAN:
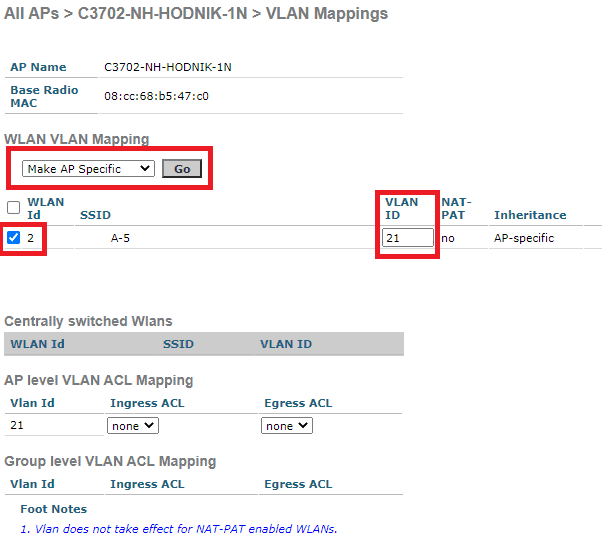
Next click on VLAN Mappings. Tick SSID under WLAN id, enter wifi clients VLAN under VLAN ID (in my case VLAN 21) and click Go at section Make AP specific.
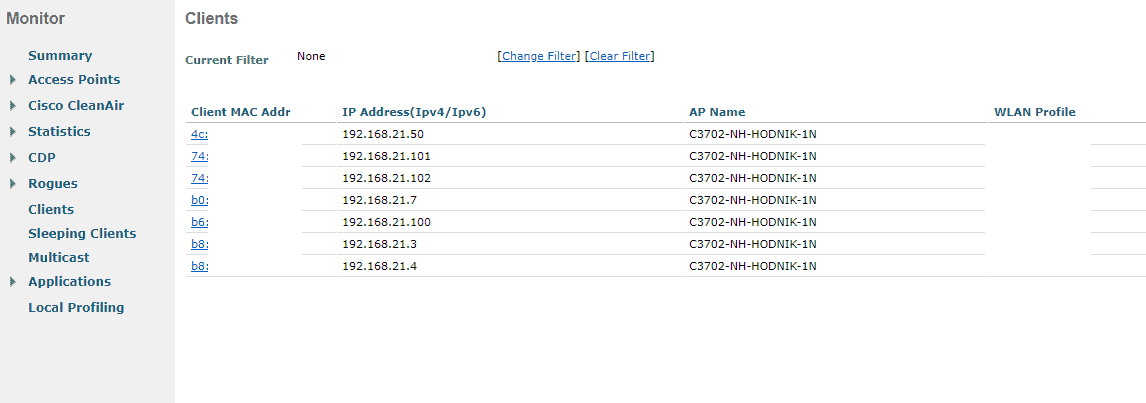
10. You wifi clients should be able to connect now
11. 60 days trial license
There is a 60 days trial license, but you can enable RTU (right to use) license that will not expire (note: this is against cisco TOS).
Go to WLC GUI -> MANAGEMENT -> Software Activation -> Licenses -> license count: custom number -> Set Count -> Accept EULA and you are done.
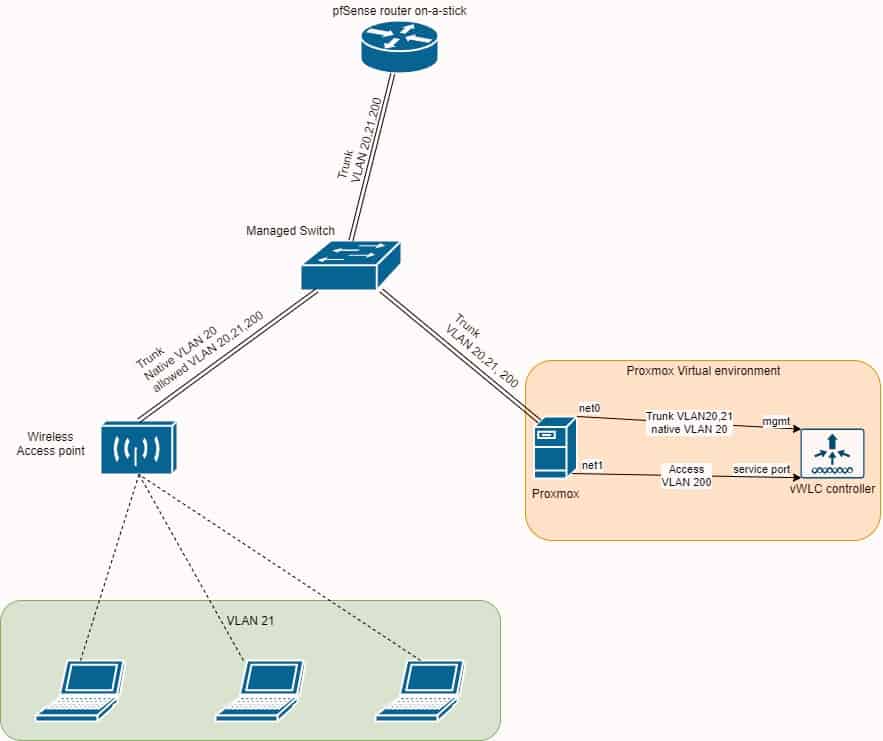
12. Quick topology drawing