My SDRsharp was often crashing so I wanted to use rtl_fm CLI (command line interace) to receive NOAA images. I found this post http://www.rtl-sdr.com/an-alternative-noaa-weather-satellite-tutorial-using-rtl_fm-and-wxtoimg/ which was poorly and incompletely written but it gave me a jump start.
This was tested on a 64bit Windows 7. I assume you have Zadig drivers working already (http://www.rtl-sdr.com/tag/zadig/)
The software:
- WxToImg (http://www.wxtoimg.com/downloads/)
- rtl_fm (http://osmocom.org/projects/sdr/wiki/Rtl-sdr) – find RelWithDebInfo.zip
- sox (https://sourceforge.net/projects/sox/files/sox/) – my version is 14.4.2
- VB Cable (http://www.vb-audio.com/Cable/index.htm#DownloadCable)
- MCE Controller (https://github.com/tig/mcec/wiki)
- Virtual serial port driver (https://www.eltima.com/products/vspdxp/)
Theory:
WxToImg will send commands to MCE controller which will start rtl_fm and sox applications which will pipe the audio to virtual audio cable. WxToImg will listen to virtual audio interface and capture the data.
TL;DR: WxToImg -> MCE -> rtl_fm+sox -> Virtual audio cable -> WxToImg
NOTICE: This tutorial does not include doppler shift correction but with NOAA it’s not that important.
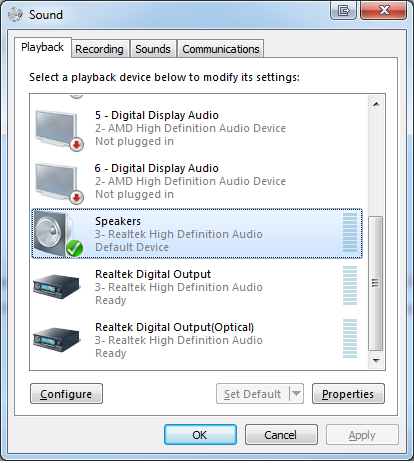
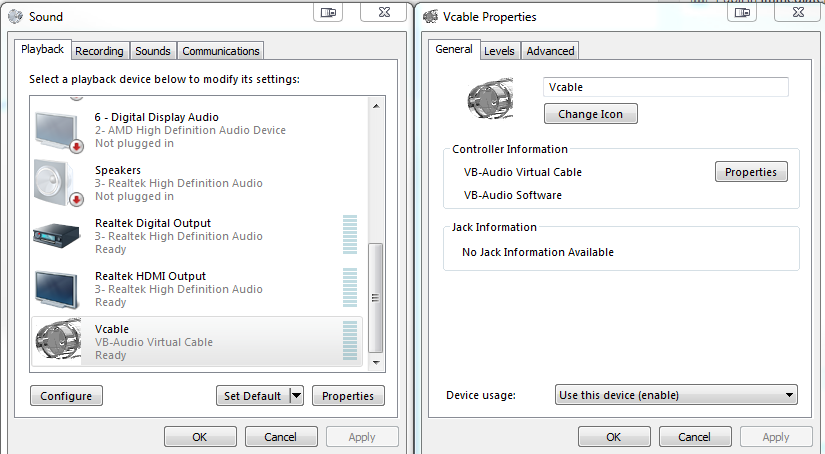
1. Install Virtual Audio Cable
The following step is optional but recommended. We’ll need it later for the sox.
Go to playback devices (right click on the speaker in the taskbar).
Right click on your VB-Audio Virtual Cable, properties and rename it to Vcable.
2. Download and install sox (https://sourceforge.net/projects/sox/files/sox)
If you get missing DLL files when runing sox, install Microsoft Visual C++ 2010 Service pack 1 Redistributable package MFC security update.
3. Download rtl_fm software and unzip it (http://osmocom.org/attachments/download/2242/RelWithDebInfo.zip)
4. Download and install Virtual Serial port driver (https://www.eltima.com/download/vspd.exe)
Open the app, select two COM ports and click add pair.
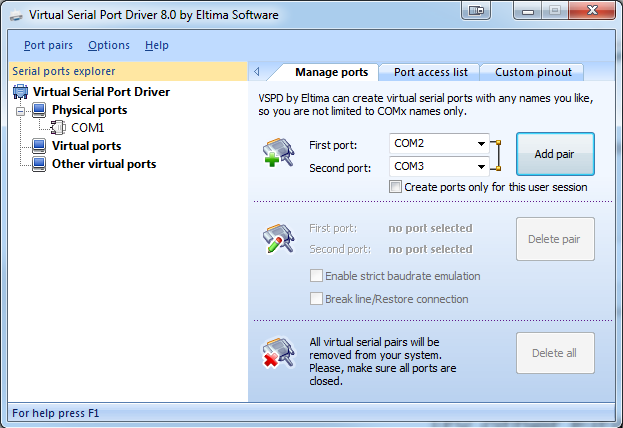
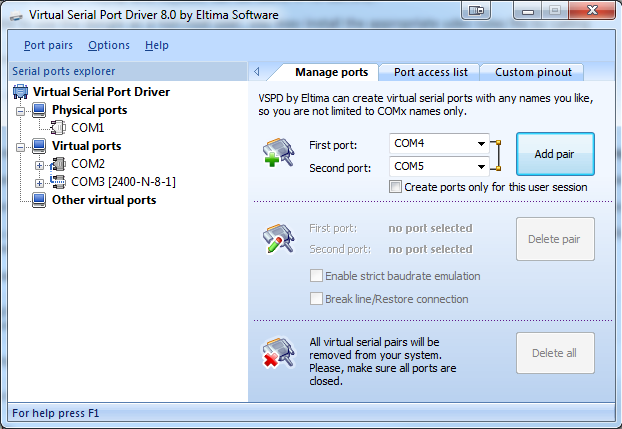
You end up with COM2 and COM3 in the left menu. You can choose different ports, but you need to reflect that in WxToImg and later in MCE controller settings.
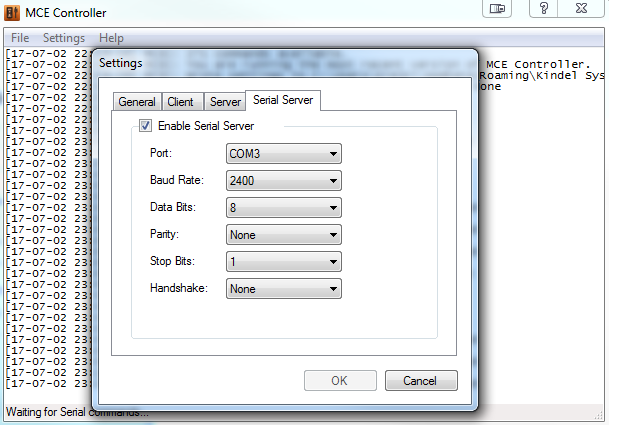
5. Download and install MCE control (https://github.com/tig/mcec/releases/download/1.9.0/MCEController.Setup.exe)
Open it and go to Settings -> Serial server
Tick Enable serial server
Port: COM3
Baud rate: 2400
6. Install WxToImg and register it with this data:
Name: Carl Rakotondrainibe
Email: carl@Rakotondrainibe.com
Key: EA5M-N3VZ-R6HZ-CFF9-7FC2
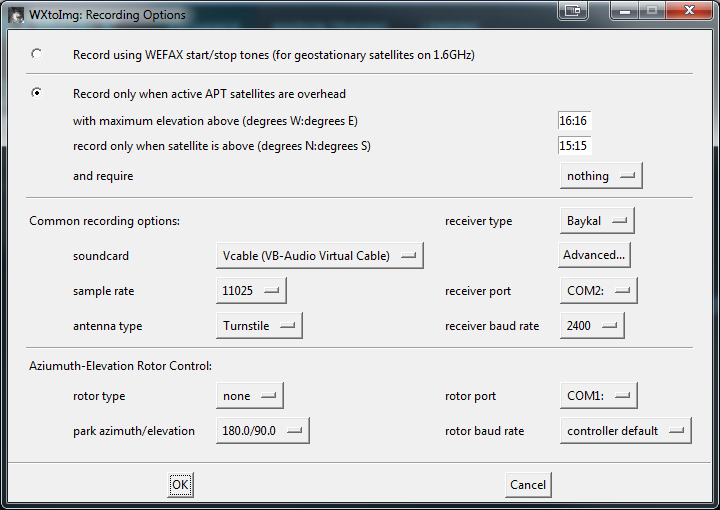
Setup all your preferences and go to Options -> Recording options
Under Common recording options:
soundcard: Vcable
receiver type: select Baykal (unregistered version is missing this option)
receiver port: COM2
receiver baud rate: 2400
Save and exit
MCE controller and WxToImg should now be connected together with COM2 – COM3 pair we created earlier.
7. Create a file for MCE controller commands.
MCE will recognize the commands sent by WxToImg and start rtl_fm and sox.
Find your MCEcontrol.exe location (usually in “C:\Program Files (x86)\Kindel Systems\MCE Controller\”)
Go to that folder and create a new file named MCEControl.commands
Add this text to it and save it:
<?xml version="1.0" encoding="utf-8"?>
<MCEController xmlns:xsd="http://www.w3.org/2001/XMLSchema" xmlns:xsi="http://www.w3.org/2001/XMLSchema-instance">
<Commands xmlns="http://www.kindel.com/products/mcecontroller">
<!-- Place command definitions here -->
<!--
==================================================================
StartProcess Commands
File: The full path to the executable you want to start.
==================================================================
-->
<StartProcess Cmd="RF01376200" File="F:\satreceive\noaa15.bat"/>
<StartProcess Cmd="RF01379125" File="F:\satreceive\noaa18.bat"/>
<StartProcess Cmd="RF01371000" File="F:\satreceive\noaa19.bat"/>
<StartProcess Cmd="RF01375000" File="F:\satreceive\noaa19.bat"/>
<StartProcess Cmd="MUA" File="F:\satreceive\killrtl.bat"/>
</Commands>
</MCEController>
IMPORTANT: Change the path of the bat files to your own location. Bat files are included in the next steps.
Just a brief explanation of the MCEcontrol.commands file:
Cmd="RF01376200"
= Command sent by WxToImg, a frequency of the NOAA15 Satellite and must be linked with noaa15.bat
Cmd="MUA" File="F:\satreceive\killrtl.bat"
= Command sent by WxToImg to start and stop recording
8. Bat files (make sure to edit them to match your sox, rtl_fm locations and rtl_fm device settings like gain and ppm correction):
noaa15.bat
REM start minimized
if not DEFINED IS_MINIMIZED set IS_MINIMIZED=1 && start "" /min "%~dpnx0" %* && exit

@echo off
REM setup paths, mind the end backslash

SET sox_path="F:\Program Files (x86)"\sox-14-4-2\
SET rtl_fm_path=F:\rtl-sdr-release\x64\
REM set RTL device number, run rtl_test, usually it's device 0 with only 1 dongle connected
REM set gain
REM set ppm correction
REM set your audio device, usually virtual audio cable

SET device=0
SET gain=49.6
SET ppm_correction=1
SET audiodevice=Vcable

REM Run sox and rtl_fm
%sox_path%sox.exe -r 48000 -t raw -es -b 16 -c 1 "|%rtl_fm_path%rtl_fm.exe -d %device% -f 137.62M -s 48000 -g %gain% -p %ppm_correction% -F 9 -A fast -E DC" -t waveaudio %audiodevice%

exit
noaa18.bat
REM start minimized
if not DEFINED IS_MINIMIZED set IS_MINIMIZED=1 && start "" /min "%~dpnx0" %* && exit

@echo off
REM setup paths, mind the end backslash

SET sox_path="F:\Program Files (x86)"\sox-14-4-2\
SET rtl_fm_path=F:\rtl-sdr-release\x64\

REM set RTL device number, run rtl_test, usually it's device 0 with only 1 dongle connected
REM set gain
REM set ppm correction
REM set your audio device, usually virtual audio cable

SET device=0
SET gain=49.6
SET ppm_correction=1
SET audiodevice=Vcable

REM Run sox and rtl_fm
%sox_path%sox.exe -r 48000 -t raw -es -b 16 -c 1 "|%rtl_fm_path%rtl_fm.exe -d %device% -f 137.9125M -s 48000 -g %gain% -p %ppm_correction% -F 9 -A fast -E DC" -t waveaudio %audiodevice%

exit
noaa19.bat
REM start minimized
if not DEFINED IS_MINIMIZED set IS_MINIMIZED=1 && start "" /min "%~dpnx0" %* && exit

@echo off
REM setup paths, mind the end backslash

SET sox_path="F:\Program Files (x86)"\sox-14-4-2\
SET rtl_fm_path=F:\rtl-sdr-release\x64\

REM set RTL device number, run rtl_test, usually it's device 0 with only 1 dongle connected
REM set gain
REM set ppm correction
REM set your audio device, usually virtual audio cable

SET device=0
SET gain=49.6
SET ppm_correction=1
SET audiodevice=Vcable

REM Run sox and rtl_fm
%sox_path%sox.exe -r 48000 -t raw -es -b 16 -c 1 "|%rtl_fm_path%rtl_fm.exe -d %device% -f 137.1M -s 48000 -g %gain% -p %ppm_correction% -F 9 -A fast -E DC" -t waveaudio %audiodevice%

exit
killrtl.bat
@echo off
taskkill /IM rtl_fm.exe /F
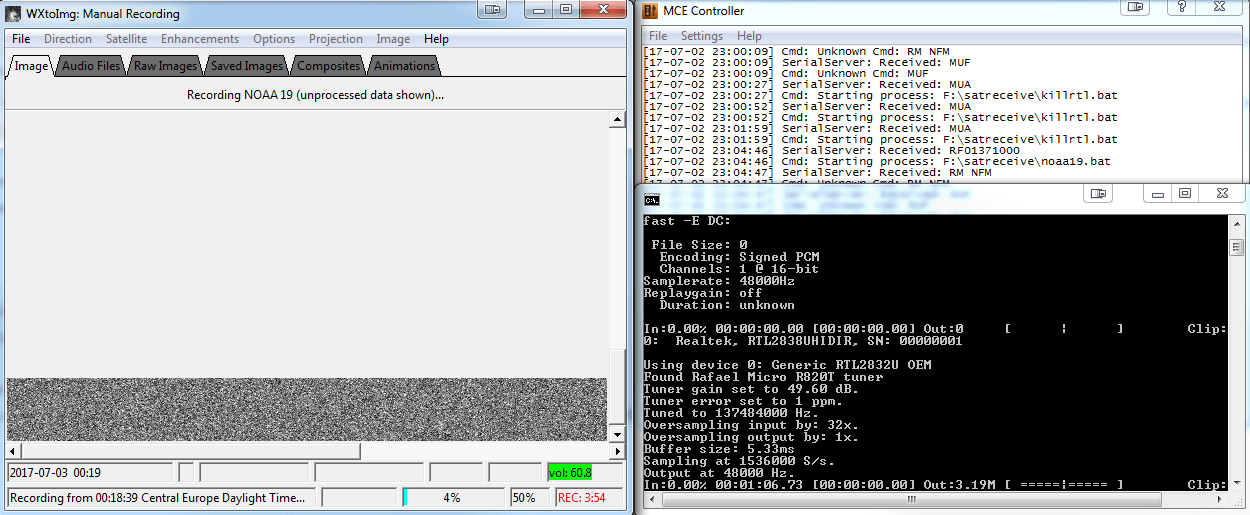
Everything should be set now. You can test it by going to WxToImg File -> Manual Test
You should see some data in the MCE Controller, bat file executed and WxToImg recording: