You need to manually reapply some settings in Cisco DNAC after the upgrade.

Currently I noticed two issues after upgrading DNAC in all previous version including the latest (currently on 2.3.5.5):

– Backups stop working. Solution is to reapply settings. It’s enough to modify one letter in Server Path in NFS tab and click Apply:

– DNAC can’t reach ISE PAN server (ISE PAN ERS reachability failed for ISE server). Solution is to reapply ISE server connections, just enter the password again and apply it. Settings are located in System Settings, Authentication and Policy servers:

In Cisco DNA center, version 2.3.3.6, under System -> Settings -> Trust & Privacy -> Device Certificate and PKI Certificates, you get an error message saying:

Internal Server Error: An unexpected condition was encountered. Please try after the system is restored.

Current solution is to restart pki broker and jboss service from DNAC shell.

magctl service restart -d apic-em-pki-broker-service
magctl service restart -d apic-em-jboss-ejbca

Wait a few minutes after restart and try again.

This is probably related to this bug: https://bst.cisco.com/bugsearch/bug/CSCwd25799

Install npm, Puppeteer and dependencies:

apt update -y && apt upgrade -y
apt install -y npm
apt install -y libx11-xcb1 libxcomposite1 libxcursor1 libxdamage1 libxi-dev libxtst-dev libnss3 libcups2 libxss1 libxrandr2 libasound2 libatk1.0-0 libatk-bridge2.0-0 libpangocairo-1.0-0 libgtk-3-0 libgbm1
npm install -g n
n lts
hash -r
npm install puppeteer

Install Chrome without snap:

wget https://dl.google.com/linux/direct/google-chrome-stable_current_amd64.deb
apt install ./google-chrome-stable_current_amd64.deb

Make a test file test.js:

const puppeteer = require('puppeteer');
const fs = require('fs');

async function run () {
  const browser = await puppeteer.launch({
    executablePath: '/usr/bin/google-chrome-stable',
    args: ['--no-sandbox'],
    defaultViewport: {width: 1920, height: 1080}
  });
  const page = await browser.newPage();
  await page.goto('https://www.google.com');
  await sleep(3000);

  await page.screenshot({path: 'screenshot.png'});
  const html = await page.content();
  fs.writeFileSync('source.htm', html);

  browser.close();
}
run();

function sleep(ms) {
  return new Promise((resolve) => {
    setTimeout(resolve, ms);
  });
} 

Test it:

node test.js

When you are greeted by this error: Error code: SSL_ERROR_INTERNAL_ERROR_ALERT trying to access Cisco WLC via Web GUI, you need remove trustpoint TP-self-signed-X cert, and reenable http server. This will regenerate self signed cert.

C9K5#show run | inc trustpoint TP-self
crypto pki trustpoint TP-self-signed-2997515006

C9K5#conf t
Enter configuration commands, one per line.  End with CNTL/Z.

C9K5(config)#no crypto pki trustpoint TP-self-signed-2997515006
% Removing an enrolled trustpoint will destroy all certificates
 received from the related Certificate Authority.

Are you sure you want to do this? [yes/no]: yes
% Be sure to ask the CA administrator to revoke your certificates.

C9K5(config)#no ip http server
C9K5(config)#no ip http secure-server
C9K5(config)#ip http server
C9K5(config)#ip http secure-server
C9K5(config)#ip http authentication local  

Cisco DNA center currently lacks a feature to export all inventory. You can’t export serial numbers for power supplies and network modules. This bash script is very simple and primitive, it connects to Cisco device via SSH and collects inventory data. If you have a lot of devices, this will take a lot of time. You need to modify this script for parallel ssh connections if you have more than 100 devices. For more info, read the script comments.

#!/bin/bash

# SSH credentials for Cisco devices
# For security reasons, make sure the user is read only capable
user=CiscoUsername
password=CiscoPassword

# Path to file where IPs of devices are stored (one IP per line)
file=devices.txt

# Mail settings
mailrelay="smtp=some.mail.server:25"
sender=no-reply@somedomain.com
mailto=some.user@somedomain.com
mailsubject="inventory bash exporter - C9K2,C9K3,C9K5 devices"

# Path to output file (exported inventory file)
results=results.txt

# Cleanup from before

rm -f "$results"

# Check if necessary files exist
if [ ! -f "$file" ]; then
    echo
    echo "ERROR: Missing file with IP addresses. Exiting ..."
    echo
    exit 1
fi

lines=$(cat $file)

for line in $lines
do
        # Connect to device, read hostname and append output to file. I filter hostname by "-SDA-", because each device
        # contains "-SDA-" in hostname, in my case. You need to modify this to your own needs.
        sshpass -p "$password" ssh -t -q -o ConnectTimeout=5 -o StrictHostKeyChecking=no -o UserKnownHostsFile=/dev/null\
        "$user"@"$line" 'show run | i hostname' | grep "\-SDA\-" | sed 's/=//g' | sed 's/\//g' | sed 's/ //g' >> "$results"

        # Connect to device, read inventory, filter output to get desired results (you can modify this to your own needs)
        # and append output to file. I filter out SFP modules, FAN trays, Stack modules.
        sshpass -p "$password" ssh -t -q -o ConnectTimeout=5 -o StrictHostKeyChecking=no -o UserKnownHostsFile=/dev/null\
        "$user"@"$line" 'show inventory' | grep PID | awk '{print $2,$7,$8}' | sed 's/ //g' | grep -v "," | sort | uniq | sed 's/SN:/,Serial:/g' |\
        grep -v "SFP\|FANTRAY\|FTRJ\|GLC\|FTLF\|STACK" >> "$results"

        printf "\n" >> "$results"
done
    # Send results to an email 
    echo "Export generated: $(date). See attachment." | mailx -r "$sender" -S "$mailrelay" -s "$mailsubject" -a "$results" -v "$mailto"
    echo
    # Send done message to console
    echo "Done, check "$results"! or email"
    echo

Had some issues with Cisco DNAC and Stealthwatch. After settings up Stealthwatch server and Netflow collector, some of SDA devices were not compatible with Stealthwatch. The reason was: “NBAR is enabled on this device“. In DNA center, NBAR and CBAR was actually disabled, but the problem stil persisted. CBAR and NBAR were previously enabled, but after disabling it, it did not clean all devices. Guess this is a “cleanup” bug in DNA center. Solution was to manually remove ip flow from affected devices.

DNA center version: 2.3.3.4

Screenshot of affected devices:

Solution: Clear ip flow from all interfaces on affected device, and resync device in DNA center.

Example:

conf t
int range gi1/0/1-48,Te1/1/1-4,Gi1/1/1-4
no ip flow monitor dnacmonitor input
no ip flow monitor dnacmonitor output
end
wr

Go to DNA center, Inventory -> Select device -> Actions -> Inventory -> Resync device

Wait couple of minutes, and you should be able to enable Stealthwatch for this device.

UPDATE: Apparently they are willing to refund me via 3rd party company (Bluesnap) that handles paysafecard payment processor for them. And if that’s not enough, that I have to utilize 3rd party business to get my money back, guess what, they are unable to refund me directly to my paysafe account, they require my bank account name, IBAN and BIC. They make it almost impossible to get your money back. Avoid PureVPN scammers.

—————————————————————————————————————————————————————————

So this is what happened. I was looking for a VPN service that does not require a credit card, because I don’t have one. Then I found PureVPN, they have a lot of payment options including paysafe card. I went to the gas station, purchased paysafe card and funded my account. I bought PureVPN 2 year package for 69$ with paysafe card. To my surprise, VPN stopped working few hours after the purchase was made. I’ve checked my email and received a messsage from them noticing me about my VPN account being disabled due security measures. They wanted me to verify my account by sending them a scan of my credit card. So, WTF, I bought their service with paysafe card because I don’t have a credit card, and they want me to verify the account with the credit card? Why would I even buy their service with paysafe card if I had a f*****g credit card? Where’s the logic behind that? I replied to their message and told them I don’t have a credit card and if they don’t like it they should just refund me. They replied with some bullshit generic text “about caring for the customers, jada jada, bullshit, more bullshit”. On the top of that email, they sent another generic mail noticing me that they will suspend my account if I don’t verify it, with a credit card. Really, did you even read what I’ve wrote the last time about not having a credit card? So, their lack of understanding about my situation and not mentioning it in the replies by just sending me generic non personalized emails tells me that they are scammers and they are stealing money from customers. Also, the service sucks, during a few hours I had a chance to test their service I tried many different servers on a different continents. I have a 220 mbit line but their VPN bandwidth never exceeded 50/60 mbit. So F*** you PureVPN scammers, you can keep my money and shove it up your a**. I will never recommend your fraudulent services to anyone else ever. DO NOT BUY PUREVPN.

TL;DR:

  • Bought PureVPN with paysafe card because I don’t have a credit card
  • They disabled my account and wanted verification by sending them a scan of a credit card that I obviously don’t have
  • They did not want to refund me, they ignored my issue about not having a credit card
  • Service sucks, low bandwidth
  • DO NOT BUY PUREVPN

1st security measure email:

My reply:

Their second and third reply:

TL;DR:

  1. SSH login to QNAP
  2. Identify virtual switch you want to put into monitoring mode, in my case qvs1
  3. Set ageing to 0
brctl show
brctl setageing qvs1 0

My example:

I’ve created a virtual machine  (SecurityOnion) on my QNAP virtualization station to monitor my home network traffic. I have setup a port mirroring on my switch to send all traffic to the QNAP ethernet adapter number 2. (My QNAP has 4 ethernet adapters). Sniffing OS usually needs two ethernet adapters, one for management and one dedicated for monitoring (sniffing). I’ve created a new virtual switch in QNAP with adapter number 2 and set it to external mode (no IP address), then I assigned this virtual switch to monitoring interface in SecurityOnion. I should’ve been able to see all the traffic now, but that wasn’t the case. There were no packets flowing to my monitoring ethernet adapter. After some investigating I found out a reddit user had the same problem. This is the solution:

SSH into your QNAP with your admin username and credentials. Check your virtual switches with a command “brctl show“, this will list all virtual switches you created. Now you need to select the virtual switch you assigned to your sniffing ethernet adapter in my case, that was adapter number 2 and run the following command: “brctl setageing qvs1 0″, where qvs1 is the number of your selected virtual switch (one that will do the sniffing, in my case adapter 2, identified as qvs1). That’s it, you should see all packets on the sniffing interface now. Thanks go to the reddit user I don’t want to name due privacy concerns.

SecuritOnion is now receiving packets on the monitoring interface:

Side note: Sniffing and analyzing traffic is heavy on CPU, HDD and RAM resources. Qnap is not a suitable candidate for that. My Qnap tests showed a CPU bottleneck (quad core celeron N3160) averaging around 70% cpu usage with low network traffic and less than 20 devices on the network.

I wanted to limit upload speed of my torrent clients (utorrent, qbittorent) with port forwarding enabled. This can be done on the client itself but I prefer the method via firewall.

For this example I forwarded port 17123 to my qbittorent client and limited upload speed to 1mbit/s. There are probably other more “proper” methods to achieve this on Pfsense, but this is working for me:

Set up a port in a client:

Go to Pfsense, Firewall, traffic shaper, limiters:

Click New limiter

Tick Enable limiter and its children

Name it upload1mbit

Set Bandwidth to 1 Mbit/s

Set Mask to Source addresses and set Description to something you like and save.

For limiters to work you also need to make a download limiter. Click new limiter and name it download1000mbit

Set bandwidth to 1000 Mbit/s

Set mask to Destination addresses

Set description and click save.

Now go to firewall, NAT and add a new rule:

Interface: WAN

Protocol: Depends on your needs, usually TCP, UDP or both

Destination: WAN address

Destination port range: 17123 to 17123

Redirect target IP: LAN IP of the machine torrent client is running on, example 192.168.0.2

Redirect target port: 17123

Description: Torrents

Click Save


Now go to firewall, rules, WAN and find the associated rule we created in the previous step, click edit.

Scroll down to the bottom and click Display Advanced, scroll down again to find In / Out pipe.

For In select download1000mbit, and for out select upload1mbit, save and apply changes. This is the opposite of what you do when you want to limit LAN IP bandwidth, because this rule is applied to WAN interface not LAN. Click save and the limiter should work. You should always reset the states when applying new settings to filters. You can do that on Diagnostics, states, reset states.

I will add more images later, this is only a quick draft. It should be sufficient to set up a rule though.

My HW/SW setup:

Dongle: SDR USB Dongle (Realtek RTL2832U R820T chipset, other SDR dongles may also work). Search Ebay for RTL2832U dongles. They should all work.

OS: Windows 7, 64bit

Capture software: SDR# from sdrsharp.com

Decoder: AFSK1200

Note: Don’t install any software drivers that came with the SDR Dongle. Uninstall the drivers, if you already installed them.

1. Setup stereo mix:

Stereo mix is used to forward output sound to the microphone input. We need this, because AFSK1200 decoder will be listening to the microphone input. Open sound options in control panel or just go to start and enter mmsys.cpl. Using USB headset will not work, you need analog speakers. There are some workarounds to use USB headsets but I haven’t tried them yet.

Playback tab: set speakers to the default device.

speakers

Recording tab: if you don’t see the “Stereo mix device”, it’s probably hidden.

  • Right click anywhere in the field where devices are listed and tick “Show disabled devices“, “Show disconnected devices. Stereo mix shold be available now.
  • Right click on it and select “Enable“.

recording2

2. Download  and configure SDR# software:

  • Download http://sdrsharp.com/downloads/sdr-install.zip
  • Extract it and run install.bat
  • Plug in your SDR dongle, go to sdrsharp folder and run zadig.exe. Go to Options and tick “List all devices“. Select “Bulk-In, Interface (Interface 0)” and click “Install Driver”. (On my screenshot, you can see “Reinstall Driver, because I already installed it). Note: You will need to install driver again if you replug the dongle in another USB port.

zadig

  • Run SDRSharp.exe
  • Source -> RTL-SDR (USB)
  • Radio -> NFM, enable Squelch and set it between 50 and 80, you can increase or decrease it depending on your surrounding environment
  • Frequency Manager -> New -> add the frequency you want to monitor, in my case it’s 144.800 Mhz.
  • Click on Play button at the top of SDR# You will see spikes when something is transmitting on the frequency

sdrsharp

3. Decode packets with AFSK 1200 Decoder:

  • Download AFSK 1200 Decoder
  • Select Input and choose Stereo mix
  • Click play button. You are now decoding APRS packets

afsk1200

Don’t forget to disable stereo mix and set the default playback device as you had before when you finish decoding.

I used my RaspberryPI to setup an APRS digipeater. The software I used is called Xastir. The problem is, there are no good default maps to use in Xastir.

This tutorial will guide you how to install OSM maps into Xastir software. Maps are generated on a Windows machine, then transferred to a Linux machine where Xastir is running.

TL;DR version:

1. Download Taho application for Windows.

2. Select area, copy bbox text.

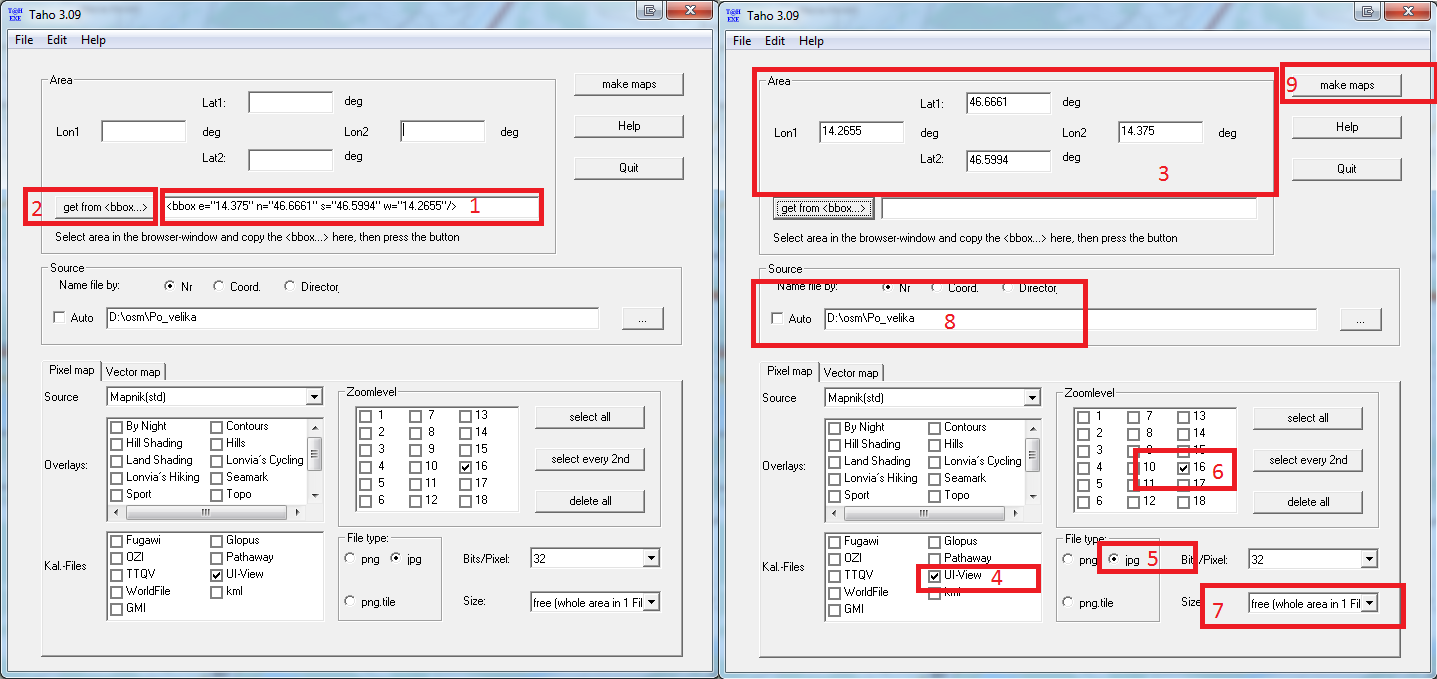
3. Paste bbox text to Taho, click on bbox button, select parameters and click on make maps.

4. Upload generated .inf and .jpg files to your Xastir map folder.

5. Download inf2geo.pl to your linux machine and convert .inf files to .geo files.

6. Start or restart Xastir, select your map and apply.


Detailed version:

1. Download Taho application for Windows (Version 4.01 didn’t work on my PC, you should download older versions, if you can’t run the newest version).

2. When you launch the Taho application, it will also open the bbox tool site.

3. On the bbox tool site, center map to your desired location and click button “select area”. Select your area.

Note: If you select too big area, you won’t be able too select top zoom levels in the next steps.

bboxtool

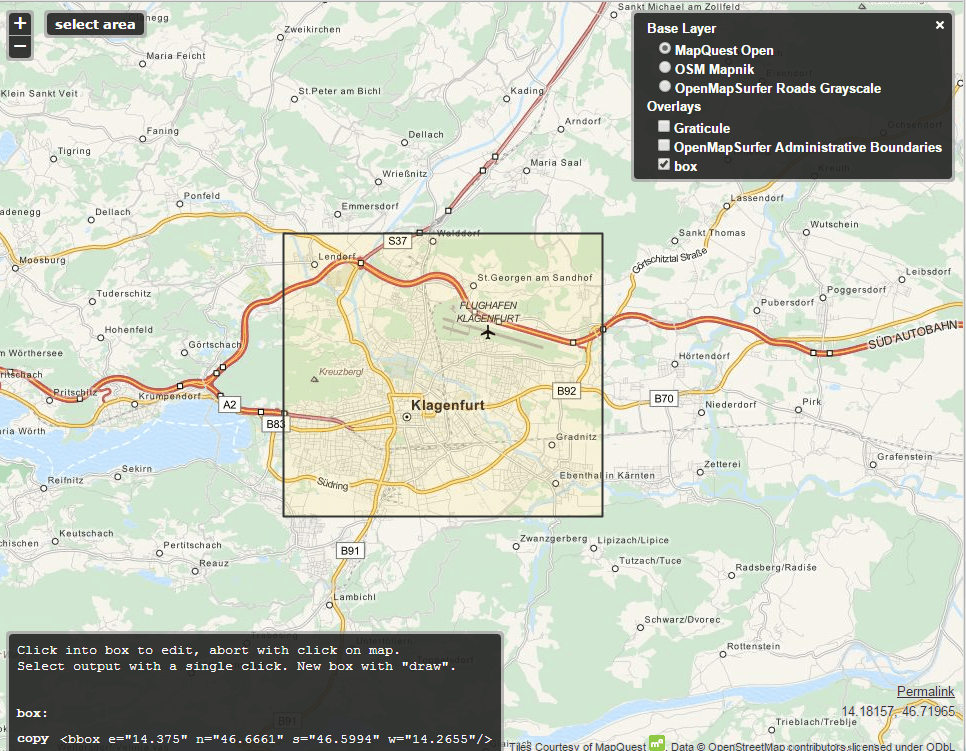
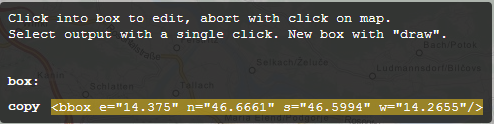
4. Copy code in the grey box to your clipboard.

greybox


5. Open Taho application and paste the code into “Get from <bbox…>” field. Click on the bbox button now. It should populate coordinates into Taho application. Select UI-View in Kal.-Files, .jpg for file type, zoom level (16 is good for small city), size (should be free, whole area in 1 file), define path for saving your maps and click on make maps button.

steps


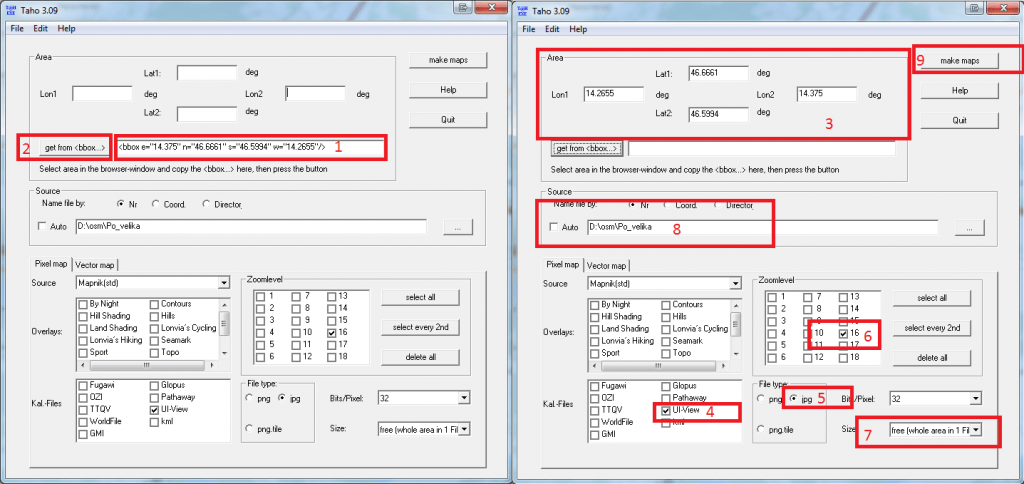
6. Each selected zoom level generates separate .jpg and .inf files in your defined maps path (step above).

7. Xastir doesn’t know how to handle .inf files so we need to convert them to .geo format. Upload your .jpg and .inf files to Xastir map folder. In my case, maps are located in  /usr/share/xastir/maps Fire up your linux console and

Download inf2geo.pl converter and convert .inf files:

sudo cd /usr/share/xastir/scripts
sudo wget https://raw.githubusercontent.com/mgrennan/xastir/master/scripts/inf2geo.pl
sudo chmod +x inf2geo.pl
sudo ./inf2geo.pl /usr/share/xastir/maps/yourmap.inf

By now, you should have yourmap.geo file in /usr/share/xastir/maps
Open .geo file with your favourite editor and correct the path if you have to.

FILENAME    maps/yourmap.jpg
TIEPOINT    0           0       16.0645 45.8288333333333
TIEPOINT    5631        5887    14.661666666667        46.8525
IMAGESIZE   5632        5888
#5632x5888
#
# Converted from a .INF file by WE7U's inf2geo.pl script
#

Note: If you change the name of the file, you also have to change FILENAME in yourmap.geo accordingly.

8. Start or restart Xastir, go to Map -> Map Chooser -> select your map -> Apply -> profit.