This is useful when you can’t use peer to peer (site to site) tunnel. For example, when you don’t have administrative access to a remote network (you can’t open ports, you can only go out – egress). To bypass this and gain access to remote network devices, you can simply install a VPN client on the remote network and make it act as a gateway for your local network. I will not go trough basic OpenVPN server configuration (generating certs, adding users etc), I will only pinpoint the parts that differ from a normal VPN client server setup.

Example:

Remote network: 192.168.10.0/24 (Client side)

Local network: 192.168.1.0/24 (Server side)

1. Go to OpenVPN server settings, under advanced configuration, custom options and enter:

 push "route 192.168.1.0 255.255.255.0";

route 192.168.10.0 255.255.255.0; 

2. Go to OpenVPN client specific overrides tab and add a new rule. Select your OpenVPN server, enter common name (name of the user – VPN client), under IPv4 remote network/s enter: 192.168.10.0/24

3. If you haven’t already, you have to assign an interface to your VPN server. Go to Interfaces, Assignments, Available network ports: ovpns1, click Add and save. Click on your newly created interface, check box Enable interface and add a description: OpenVPN1 (name it however you want), save.

4. Go to System, routing, static routes.

Add a new route, destination network: 192.168.10.0/24

Gateway: OpenVPN1

5. You need to enable NAT and forwarding on a client, this example is for a linux client:

 sysctl -w net.ipv4.ip_forward=1

iptables -t nat -A POSTROUTING -o eth0 -j MASQUERADE

iptables -t nat -A POSTROUTING -o tun0 -j MASQUERADE 

6. Connect your VPN client, you should be able to access devices behind the client from your local network.

I couldn’t find any manuals or schematics online about this exact board so I had to figure out where to plug the HDD LED activity light on the board. It’ should be written on the motherboard like the other front panel items (power led, turbo led, turbo switch, reset) but that wasn’t the case. HDD IDE LED pins are located at the top of the motherboard (J6 and J4 pins).

Model number of the board:

To connect via RTSP:

rtsp://camera_username:camera_password@IP:rtsp_port/live/ch00_1

Example:

rtsp://admin:admin123@192.168.30.102:554/live/ch00_1

If you are filtering outgoing connections, allow this outgoing ports to camera:

554 TCP

6970-6990 UDP

You can test RTSP stream with VLC media player.

Possible bug: When you connect to the camera with your phone, disconnect from it and then try to open rtsp stream in VLC media player, it will only load the first frame and stuck there. You need to reboot the camera, connect to rtsp with VLC media player without accessing it via mobile device.

Extra note: It’s advisable to block outgoing traffic from camera into internet. My camera is connecting to some IP with weird ports.

Quick whois showed me this IP belongs to alibaba.com. I did not sniff the traffic, so I’m not sure if the nature of it is spyware. It’s probably their cloud service or some other service.

For the extra paranoid, physically disconnect the microphone on the camera:

TL;DR:

Xerox phaser 3020 black ink percentage remaining – SNMP cacti data and graph template at the bottom of this post.


With some tweaks this method should also works for other brand printers.

With the help of this article: https://thwack.solarwinds.com/docs/DOC-171511 I could set up a cacti template for my Xerox 3020 printer. Some printers return ink level value in percents but in my case I got only the raw value.

1. Get SNMP toner max capacity value, OID for that is 1.3.6.1.2.1.43.11.1.1.8.1.1

root@cacti: snmpget -v2c -c public 192.168.0.251 1.3.6.1.2.1.43.11.1.1.8.1.1
SNMPv2-SMI::mib-2.43.11.1.1.8.1.1 = INTEGER: 700

700 is the raw value for 100% toner capacity.

2. Get SNMP toner current levels value, OID for that is 1.3.6.1.2.1.43.11.1.1.9.1.1

root@cacti: snmpget -v2c -c public 192.168.0.251 1.3.6.1.2.1.43.11.1.1.9.1.1
SNMPv2-SMI::mib-2.43.11.1.1.9.1.1 = INTEGER: 686

686 is the current raw value of my toner levels. To calculate toner ink percentage remaining we need to divide current raw value (686) with max raw value (700) and multiply it by 100. 686 / 700 * 100 = 98 (percentage of ink remaining). Since the max raw value is a nice number (700), we can just divide current raw value with 7, 686/7 = 98. We can use this formula for our CDEF definitions in cacti later. Remember, this is only for Xerox 3020, other brand printers can output different raw values and you need to correct this formula accordingly.

Xerox 3020 ink remaining percentage formula: raw_current_ink_level / 7

3. Login to cacti and go to Console -> Presets -> CDEFs

Click plus sign and create new CDEF and name it Xerox toner percentage

Click plus at CDEF Items.

CDEF Item Type: Special Data Source

CDEF Item Value: Current Graph Item Data Source

Click Save

Click plus at CDEF Items.

CDEF Item Type: Custom String

CDEF Item Value: 7 (this is the value cacti will use to divide raw data)

Click Save

Click plus at CDEF Items.

CDEF Item Type: Operator

CDEF Item Value: / (this will tell cacti to use a divide operation with the custom string we defined in a previous step).

Click Save

4. Go to Console -> Templates -> Data Source

Click plus to create new data source template and name it Printer – black toner current

Name: |host_description| – black toner current

Data Input Method: Get SNMP Data

Data Source Active: tick the right box

Internal Data Source Name: toner_current

Click Create

New Custom Data field will appear.

OID: 1.3.6.1.2.1.43.11.1.1.9.1.1

Click Save

5.1 Go to Console -> Templates -> Graph

Click plus sign

Name: Printer – black toner levels

Title: Printer – black toner levels

Vertical Label: percent

Tick Rigid Boundaries Mode

Upper Limit: 100

Click Create

5.2 Now click plus sign at Graph Template Items

Graph Item Type: AREA

Data Source: Printer – black toner current

Color: select what you like

Consolidation Function: AVERAGE

CDEF Function: Xerox toner percentage

Text Format: Available

Click save

Add another Graph template item

Graph Item Type: GPRINT

Data Source: Printer – black toner current

Consolidation Function: LAST

CDEF Function: Xerox toner percentage

GPRINT Type: Percent(Round down to the nearest decimal)

Text format: Current:

Click Save

Add another Graph template item

Graph Item Type: LINE1

Data Source: Printer – black toner current

Consolidation function: AVERAGE

CDEF function: Xeror toner percentage

Save

Your graph is now ready to device assignment.

Final result:

Download data and graph templates for xerox phaser 3020:

xerox_3020_cacti_toner_level_template


1. Update system and optionally disable X Desktop, we don’t need GUI

apt-get update
apt-get upgrade
raspi-config

Select menu: 3, B1, B1

2. Install dependencies

apt-get install subversion libsigc++-2.0-dev g++ make libsigc++-1.2-dev libgsm1-dev screen \
libpopt-dev tcl8.5-dev libgcrypt-dev libspeex-dev libasound2-dev alsa-utils install qt-sdk git groff -y

3. Add a new user

adduser svxlink

4. Download svxlink source

cd /usr/src; wget https://github.com/sm0svx/svxlink/archive/15.11.tar.gz; tar xvf 15.11.tar.gz; cd svxlink-15.11/src; mkdir build; cd build

5. Compile and install svxlink

cmake -DCMAKE_INSTALL_PREFIX=/usr -DSYSCONF_INSTALL_DIR=/etc \
        -DLOCAL_STATE_DIR=/var ..
make
make doc
make install
ldconfig

6. Install sounds

cd /usr/share/svxlink/sounds; wget https://github.com/sm0svx/svxlink-sounds-en_US-heather/releases/download/14.08/svxlink-sounds-en_US-heather-16k-13.12.tar.bz2
tar xvf svxlink-sounds-en_US-heather-16k-13.12.tar.bz2
mv en_US-heather-16k en_US; rm -rf svxlink-sounds-en_US-heather-16k-13.12.tar.bz2

7. Configure sound levels

alsamixer

Press F6 and select usb soundcard.
Press F5 to show all.
Increase gain on CAPTURE, around 80 is fine, experiment otherwise.
Exit alsamixer and save the settings with:

alsactl store

8. Tweak configuration files in /etc/svxlink/svxlink.conf and /etc/svxlink/svxlink.d/ModuleEchoLink.conf

svxlink.conf: I will show you only modified lines

Uncomment LOCATION_INFO=locationInfo to show your Echolink on aprs.fi map.
MODULES=ModuleEcholink
CALLSIGN=Yoursign-L
SHORT_IDENT_INTERVAL=0
LONG_IDENT_INTERVAL=0

Under [Rx1]

AUDIO_DEV=alsa:plughw:1 #Hardware ID of the soundcard, usually 1 on rpi with usb soundcard
SQL_START_DELAY=100 #Prevent TX, RX loop
VOX_THRESH=500 #Increase if your VOX gets falsly opened

Under [Tx1]:

AUDIO_DEV=alsa:plughw:1
PTT_TYPE=SerialPin
PTT_PORT=/dev/ttyUSB0 #Depends what you have for PTT triggering, I do it with RS232 to USB converter

Under [LocationInfo]
#This is mostly self explanatory

APRS_SERVER_LIST=poland.aprs2.net:14580
STATUS_SERVER_LIST=aprs.echolink.org:5199
#Go to maps.google.com, select your location, right click, what's here
#and you'll get coordinates, for example: 45.660325, 14.291537 Go to https://rechneronline.de/winkel/degrees-minutes-seconds.php
#and convert from decimal degrees provided from maps.google.com to degrees, arc minutes, arc seconds.
#Enter converted
#coordinates.

LON_POSITION=14.17.29E
LAT_POSITION=45.39.37N
CALLSIGN=EL-yourcallsign
FREQUENCY=145.275
TX_POWER=5
ANTENNA_GAIN=0
ANTENNA_HEIGHT=5m
ANTENNA_DIR=-1
PATH=WIDE1-1
BEACON_INTERVAL=10
TONE=123
COMMENT=SvxLink by SM0SVX (svxlink.sourceforge.net)

ModuleEcholink.conf:

ALLOW_IP=192.168.0.0/24 #Depends on your home network setup,
#it could be also ALLOW_IP=192.168.1.0/24
SERVERS=europe.echolink.org
CALLSIGN=yoursign-L
PASSWORD=your echolink password
SYSOPNAME=yourname
LOCATION=[Svx] comment about your echolink
LINK_IDLE_TIMEOUT=0
AUTOCON_ECHOLINK_ID=ID of the remote repeater for example AUTOCON_ECHOLINK_ID=609569
AUTOCON_TIME=1200
DESCRIPTION=edit text to fit your needs
reboot

9. Run svxlink

svxlink

Try to transmit, usb soundcards on rpi are tricky. You will probably get a warning:
Rx1: Distorsion detected! Please lower the input volume!
Don’t worry about it.
Exit and run svxlink as daemon

svxlink --daemon

10. Start svxlink at boot
You need to wait some time after boot for Pi to initialize devices.
It will not work when you start svxlink immediately after the boot,
the process will run but there will be no access to PTT. Open
/etc/rc.local and add this two lines at the end of the file, before exit 0

sleep 120
/bin/bash -c '/usr/bin/svxlink --pidfile=/var/run/svxlink.pid --daemon'

This will start svxlink 2 minutes after boot.

#!/bin/bash

# Rtsp to youtube streaming with ffmpeg

VBR="1000k" # Bitrate of the output video, bandwidth 1000k = 1Mbit/s
QUAL="ultrafast" # Encoding speed
YOUTUBE_URL="rtmp://a.rtmp.youtube.com/live2" # RTMP youtube URL
THREADS="0" # Number of cores, insert 0 for ffmpeg to autoselect, more threads = more FPS

CAMUSER="user"
CAMPASS="password"
CAMIP="192.168.0.2"
CAMPORT="88"
VIDEOCHANNEL="videoSub" # videoMain and VideoSub for Foscam cameras

SOURCE="rtsp://${CAMUSER}:${CAMPASS}@${CAMIP}:${CAMPORT}/${VIDEOCHANNEL}" # Camera source
KEY="xxx-xxxx-xxxx-xxxx" # Youtube account key

# To download fonts
# wget -O /usr/local/share/fonts/open-sans.zip "https://www.fontsquirrel.com/fonts/download/open-sans";unzip open-sans.zip
FONT="/usr/local/share/fonts/OpenSans-Regular.ttf"
FONTSIZE="15"

# Text allingment
x="5"
y="60"

# Other
box="1" # enable box
boxcolor="black@0.5" # box background color with transparency factor
textfile="ffmpeg.txt"
reloadtext="1" # Reload textfile after each frame, usefull for overlaying changing data 
# like weather info. To update the textfile while streaming, you need to use mv command or a crash
# is going to happen when you update the textfile.
# Example:
# wget -q https://something.com/ -O - | grep somevalue > ffmpegraw.txt; mv ffmpegraw.txt ffmpeg.txt
boxborderwidth="5"

# Ffmpeg with drawtext, 
    ffmpeg -loglevel panic \
    -f lavfi -i anullsrc \
    -rtsp_transport tcp \
    -i "$SOURCE" \
    -vcodec libx264 -pix_fmt yuv420p -preset $QUAL -g 20 -b:v $VBR \
    -vf "drawtext="fontfile=${FONT}":textfile=${textfile}:x=${x}:y=${y}:reload=${reloadtext}: \
    fontcolor=white:fontsize=${FONTSIZE}:box=${box}:boxborderw=${boxborderwidth}:boxcolor=${boxcolor}" \
    -threads $THREADS -bufsize 512k \
    -f flv "$YOUTUBE_URL/$KEY"

# Copy stream only, don't encode
#ffmpeg \
#    -f lavfi -i anullsrc \
#    -rtsp_transport tcp \
#    -i "$SOURCE" \
#    -vcodec libx264 -pix_fmt yuv420p -preset $QUAL -g 20 -c:v copy -b:v $VBR \
#    -f flv "$YOUTUBE_URL/$KEY"

Overlayed data over webcam stream example:

To run the script in background you need to add nohup otherwise ffmpeg will hang.

nohup bash this_script.sh &

Ffmpeg likes to crash from time to time. Create a script to check for ffmpeg process and restart it if there is no process running.

#!/bin/bash
#
# Description: Checks for existing ffmpeg process and starts one if needed
#
script=/path/to/first_script.sh

if ! pgrep -x "ffmpeg" > /dev/null
then
    /bin/bash $script > /dev/null 2>&1 &
fi

Save script as check_ffmpeg.sh

chmod +x check_ffmpeg.sh

Run the script with crontab every minute.

crontab -e
* * * * * sudo bash /path_to_script/check_ffmpeg.sh

#!/bin/sh

# Get APRS weather data from aprs.fi

wxstation="S55MA-10"

# Basic weather data
temp="$(wget -q https://aprs.fi/weather/a/${wxstation} -O - | grep Temperature | egrep '[-+]?([0-9]*\.[0-9]+|[0-9]+)' -o)"
humidity="$(wget -q https://aprs.fi/weather/a/${wxstation} -O - | grep Humidity | egrep '[-+]?([0-9]*\.[0-9]+|[0-9]+)' -o)"
wind="$(wget -q https://aprs.fi/weather/a/${wxstation} -O - | grep Wind | egrep '[-+]?([0-9]*\.[0-9]+|[0-9]+)' -o | sed -n -e 2p)"
rain="$(wget -q https://aprs.fi/weather/a/${wxstation} -O - | grep Rain | egrep '[-+]?([0-9]*\.[0-9]+|[0-9]+)' -o | sed -n -e 1p)"

# Telemetry
radioactivity="$(wget -q https://aprs.fi/telemetry/a/${wxstation} -O - | grep Radioactivity | egrep '[-+]?([0-9]*\.[0-9]+|[0-9]+)' -o | sed -n -e 5p)"

printf "%s\n" "Temperature: ${temp}°C" "Humidity: ${humidity}%" "Wind: ${wind} m/s" "Rain: ${rain} mm/h" "Radioactivity: ${radioactivity} uSv/h"

1. Make sure .well-known and acme-challenge directories are set permissions to 755

2. Create random file test.txt in .well-known/acme-challenge/ and try to view it with browser

If all of this is good, your certificate should renew. The problem I had on my server is that even when step 1. and 2. were ok and working, I still  got permission denied message. The problem was I setup my Varnish engine to force SSL on non SSL request. When bot requested http://somedomain.com/.well-known/acme-challenge/ it was automatically redirected to https://somedomain.com/.well-known/acme-challenge/. So,

3. Make sure you disable force SSL during renewal.

Error message example:

Failed authorization procedure. s55ma.radioamater.si (http-01): urn:acme:error:unauthorized :: The client lacks sufficient authorization :: Invalid response from http://s55ma.radioamater.si/.well-known/acme-challenge/i825k_Mk8YGTTD1GOsZvMCkZ0KaRFdext04LfQdelQs: "<!DOCTYPE html>
<html>
<head>
<title>403 Forbidden</title>
</head>
<body>
<h1>Error 403 Forbidden</h1>
<p>Forb"

Enable server ports on Xastir. We need to use the command line binary xastir_udp_client which is part of Xastir. To send the data over RF, you need to have Xastir configured with your transmitter already.

More info about the mail APRS service: http://www.aprs-is.net/email.aspx

The basic string is:

xastir_udp_client XastirIP port callsing passcode -to_rf 'callsign>APRS::EMAIL    :EmailOfReceiver@something.com message'

Real example:

xastir_udp_client 192.168.0.140 2023 S55MA-10 22222 -to_rf 'S55MA-10>APRS::EMAIL    :s55ma@radioamater.si hello'

Note: You may only send one line messages of 64 total characters maximum for the message even though the documentation is saying 67. You have to put 4 white spaces between EMAIL and EmailOfReceiver, so the total lenght of EMAIL+white spaces is 9 characters.

This post is about Xastir, but on the side note, most APRS capable handhelds stations are not able of sending email messages through APRS. One portable station that’s able to do it is Kenwood TH-D72. I found this post about it. Too bad other portables are not able to do that where this feature is the most usefull, I mean, it’s not like I’m going to need aprs to email service from my home station, I’d likely need it outdoors for emergency situations or to send an email when I’m abroad and without cellular data service.

Quick script for sending messages:

#!/bin/bash

#APRS to Email script using Xastir
#Define variables
#Xastir server and port
server=192.168.0.140
port=2023

#Authentication info
user=S55MA
passcode=22222

echo "Enter sender (yours or some others callsign)"
read sender
sendercapital="$(echo $sender | awk '{print toupper($0)}')"

echo "Enter destination email:"
read email

echo "Enter your message (max 64 characters):"
read message

#Count message characters
msglenght="$(echo $message | wc -c)"

#Restart script if message exceeds 64 characters.
if [ "$msglenght" -gt 64 ]; then
echo "Your message exceeded 64 characters, try again!"
exec bash "$0"
else
xastir_udp_client $server $port $user $passcode -to_rf "$sendercapital>APRS::EMAIL    :$email $message" >/dev/null 2>&1
echo "Message has been sent."
fi

In my previous post I wrote about sending objects and telemetry via command line to APRS-IS server.

You can also do that with Xastir, but as a bonus point, you can do it all via RF if your Xastir setup is already paired to the radio and configured to transmit. You can use the scripts from my previous blog post, you only need to change some commands.

Xastir GUI is lacking options to send multiple different beacons or telemetry data. There is a binary called xastir_udp_client that comes with normal Xastir setup which takes care of that, but you need to run it from a command line and do some custom scripting. To use this feature, you need to enable server ports. Open xastir, go to interface menu and click enable server ports.

The basic commands to create an object with a house icon are:

Send via RF:

xastir_udp_client XastirIP port user passcode -to_rf 'senduser>APN100,WIDEPATH*:=latitude/longtitude-Comment'
xastir_udp_client 192.168.0.140 2023 S55MA-10 22558 -to_rf 'S55MA-10>APN100,WIDE2-1*:=4539.94N/01417.67E-QTH'

Send via Internet only (remove -to_rf):

xastir_udp_client XastirIP port user passcode 'senduser>APN100,TCPIP*:=latitude/longtitude-Comment'
xastir_udp_client 192.168.0.140 2023 S55MA-10 22558 'S55MA-10>APN100,TCPIP*:=4539.94N/01417.67E-QTH'

Why did I write “senduser” in string? Because you can place remote objects on the map that’s not your own call sign – sticking to the protocol rules, you need to change the code to show the correct path if you want to place objects with not your own sign. The only drawback with Xastir in this example is, it overrides your permanent timestamp (111111z). More info about sending objects with not your sign is in my previous post. Why is it so “cool” to collect and send data from another stations to RF? Let’s say you want to transmit critical data to offline users like repeater offset or echolink node number. You can also transmit weather data from other non RF stations to RF. So for example if I’m walking in the forest with my handheld APRS capable station I can receive weather or repeater data directly on my handheld without having the internet.

Example:

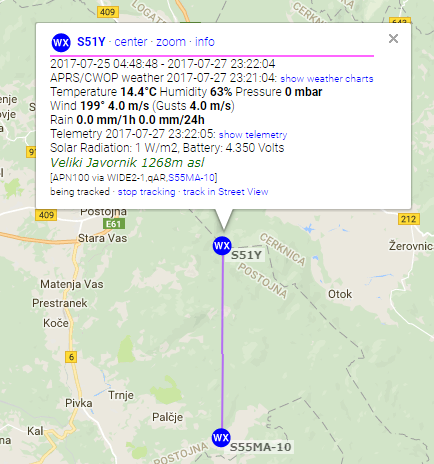
I’m collecting data from this weather station: https://www.hobolink.com/p/d0a7b4f0dbc44b973b0a5cce75a0521d and sending it to RF, including telemetry.

https://aprs.fi/weather/S51Y

Another example is sending repeater and echolink data to RF:

You see that purple lines? That means the object was put on the map via my station (S55MA-10).

You can also see the path at the bottom of a white rectangle “[APN101 via WIDE2-1,qAR,S55MA-10]”

Note that this is actually faking an object, it looks like the transmitter is at the object and it’s

being igated by my station, but it’s actually my station doing the transmissions. This is a good example  how to not

stick to the protocol rules 😉 I was unable to do it with xastir_udp_client binary, it rewrites it’s path if you want to send another

object. There is also a “bug” or a feature, I’m not sure yet, that xastir_udp_client inserts additional } in the string. I don’t know

why is that, but it’s unwanted.

If you want to show that remote object is put on the map by your station, you need to change the path as I mentioned above,

stick to the protocol, but I don’t think that’s possible with xastir_udp_client. I neglected this and I’m going to update my scripts

if I find the correct solution.

Example script I’m using to send Echolink data to RF:

#!/bin/bash

#Transmit objects via Xastir to RF.

#Define login info
user=S55MA-10
password=23458

#Define object user info
usersend=S55UPO-10

#Define xastir server
server=192.168.0.140
port=2023

#Define station location (Echolink Postojna, Pecna Reber)
lat=4546.72N
lon=01413.80E

#Define data
comment="Echolink Postojna 438.825Mhz -7.6M T123 Node:609569"
data="$usersend>APN101,WIDE2-1:=${lat}E${lon}0${comment}"

#Send object to RF
/usr/bin/xastir_udp_client $server $port $user $password -to_rf "$data"

#Debugging
#printf "$data\n"

Example of my hobolink weather collector script. Hobolink to APRS. It’s similar to the script in my previous post so I won’t go into details.

#!/bin/bash

#Read data from HOBOlink station and send it to APRS network via Xastir. Server ports option has to be enabled on Xastir.

#Create a temporary RAM disk (we don't want to write on a SD card too often).
#You need to run this script as sudo (root) or create a temporary ramdisk at boot as root
#and run this script as a normal user.
if [ ! -d "/mnt/ramdisk/" ]; then
mkdir -p /mnt/ramdisk; mount -t tmpfs tmpfs /mnt/ramdisk -o size=10m
fi

#Check if file exist
if [ ! -f "/mnt/ramdisk/sequence_numberjavornik.txt" ]; then
touch /mnt/ramdisk/sequence_numberjavornik.txt
fi

#Read sequence number
read num < /mnt/ramdisk/sequence_numberjavornik.txt
num=$((num + 1))
if (( num == 1000 )); then
num=0
fi

#Error log file
error=/var/log/wxdata.log

#Define login info
user=S55MA-10
password=passcode

#Insert the same as user. Insert other user sign if you want to put another station not owned by you on the map. Be aware that telemetry
#requires 9 char long callsign so you need to add whitespaces after the callsign and telemetry, for example:
#t2="$usersend>APN002,WIDE2-1::"$usersend" :PARM.Solar Radiation,Battery" #5 whitespaces between "$usersend" and :PARM because
#S51Y is only 4 char long.
usersend=S51Y

#Define xastir server
server=192.168.0.140
port=2023

#Define station location (Veliki Javornik, Postojna)
lat=4545.48N
lon=01417.72E_ #_ is a symbol for WX station

#Download weather data
file=/mnt/ramdisk/wxdata.txt
file1=/mnt/ramdisk/wxdata1.txt
curl -s https://www.hobolink.com/p/d0a7b4f0dbc44b973b0a5cce75a0521d | grep nobr | awk -F\> '{print $6}' | sed 's/<\/nobr//g' > "$file"
curl -s https://www.hobolink.com/p/d0a7b4f0dbc44b973b0a5cce75a0521d | grep "Wind Direction" -A 1 | grep "latest-conditions-info-reading" | awk -F\> '{print $5}' | awk '{print $2}' | grep -o '[0-9]\+' > "$file1"

if [ -s "$file" ] #If downloaded file is not empty, continue, else quit
then

#Date in UTC
zuludate="$(date -u +%d%H%M)"

#APRS needs temperature in F, data is fetched in degress C so we need to convert it.
tempC="$(sed -n -e 1p "$file")"
tempF="$(echo "((9/5) * $tempC) + 32" | bc -l | awk -F. '{print $1}')"

#Relative humidity
rh="$(sed -n -e 2p "$file" | awk -F. '{print $1}')"

#APRS need windspeed in mph, data is fetched in meters per second so we need to convert it.
windspeedms="$(sed -n -e 4p "$file")"
windspeedmph="$(echo "(($windspeedms * 3.6) / 1.609344)" | bc -l | awk -F. '{print $1}')"
gustsms="$(sed -n -e 5p "$file")"
gustsmph="$(echo "(($gustsms * 3.6) / 1.609344)" | bc -l | awk -F. '{print $1}')"

rain1h="$(sed -n -e 7p "$file" | awk -F. '{print $1}')"
winddirection="$(cat "$file1")"
solarradiation="$(sed -n -e 6p "$file")" #For telemetry only
batteryvoltage="$(sed -n -e 8p "$file" | tr -d '.' | head -c 3)" #For telemetry only

#Station comment
aprscomment="Veliki Javornik 1268m asl"

#Xastir weather variable with padding zeros for correct APRS format
printf -v xastirwx "%03d/%03dg%03dt%03dr%03dh%02d%s" "$winddirection" "$windspeedmph" "$gustsmph" "$tempF" "$rain1h" "$rh" "$aprscomment"

#Xastir user and WIDE path data
xastirpath="$usersend>APN100,WIDE2-1:=$lat/$lon"

#Telemetry
printf -v t1 "%s>APN002,WIDE2-1:T#%03d,%03d,%03d,000,000,000,00000000" "$usersend" "$num" "$solarradiation" "$batteryvoltage"
t2="$usersend>APN002,WIDE2-1::$usersend :PARM.Solar Radiation,Battery"
t3="$usersend>APN002,WIDE2-1::$usersend :UNIT.W/m2,Volts"

#Add coefficient in EQNS field to convert real data.
t4="$usersend>APN002,WIDE2-1::$usersend :EQNS.0,1,0,0,0.01,0,0,0,0,0,0.0,0,0,0,0"
t5="$usersend>APN002,WIDE2-1::$usersend :BITS.00000000,Weather station Veliki Javornik Postojna"

#Send data to Xastir
/usr/bin/xastir_udp_client $server $port $user $password -to_rf "$xastirpath$xastirwx"

#Send telemetry data to Xastir
#Send PARAMS, UNITS, EQNS and BITS every 2 hours.
#Check if file exist
if [ ! -f "/mnt/ramdisk/datejavornik.txt" ]; then
echo 0 > /mnt/ramdisk/datejavornik.txt
fi

#calculate time difference
read olddate < /mnt/ramdisk/datejavornik.txt
date="$(date +%s)"
diff="$(echo "$date - $olddate" | bc)"

if [ "$diff" -gt 7200 ]; then
/usr/bin/xastir_udp_client $server $port $user $password -to_rf "$t1"
/usr/bin/xastir_udp_client $server $port $user $password -to_rf "$t2"
/usr/bin/xastir_udp_client $server $port $user $password -to_rf "$t3"
/usr/bin/xastir_udp_client $server $port $user $password -to_rf "$t4"
/usr/bin/xastir_udp_client $server $port $user $password -to_rf "$t5"
echo "$date" > /mnt/ramdisk/datejavornik.txt
else
/usr/bin/xastir_udp_client $server $port $user $password -to_rf "$t1"
fi

#Delete old data
rm -f /mnt/ramdisk/wxdata.txt /mnt/ramdisk/wxdata1.txt

#Write sequence number
echo "$num" > /mnt/ramdisk/sequence_numberjavornik.txt

else
echo ["$(date -u)"] Error downloading data >> "$error"
fi

Link to the Hobolink to APRS script: https://pastebin.com/v6cQkm54

This is to internet only, not to RF. You need TNC software and a radio station to send it via RF.

We need ncat which is a part of nmap and bc.

sudo apt-get install nmap bc

First, some usefull tools:
APRS coordinate converter: http://digined.pe1mew.nl/?How_to:Convert_coordinates
APRS passcode generator: http://apps.magicbug.co.uk/passcode/

There are more APRS IS servers available to connect to, I decided to use poland.aprs2.net, the generic one is rotate.aprs.net.
Default port is 14580.

The protocol goes like this (more info http://www.aprs-is.net/Connecting.aspx):
– Authenticate with APRS-IS server
– Send data

So the data you are sending is:
– user yourHAMSIGN pass passcode
– objectdata

Bash one line command to send data:

printf "%s\n" "user yourHAMSIGN pass passcode" "yourHAMSIGN>APN100,TCPIP*:=latitude/longtitude-comment" | ncat poland.aprs2.net 14580

Example:

printf "%s\n" "user S55MA-13 pass 23558" "S55MA-13>APN100,TCPIP*:=4246.29N/01412.79E_247-QTH" | ncat poland.aprs2.net 14580

This should place S55MA-13 on a map with a house icon.
Look into aprs.fi raw data for your ham sign (https://aprs.fi/?c=raw&call=yourHAMSIGN) to find any formatting errors. It should look like this:

2017-07-27 16:18:32 CEST: S55MA-13>APN100,TCPIP*,qAC,T2POLAND:=4246.29N/01412.79E_247-QTH

Important: With this commands you can place (fake) or “steal” an objects that are not your own stations by placing another station sign in the second yourHAMSIGN field. This will work, but it will look like the object is coming via another station, igated by your station. That’s ok, the object will be placed correctly on the map, but for the sake of following correct protocol procedures, you need to change a string a little bit so the other station object will show correct path of where it’s coming from.

When placing another object (not your own) on the map, you need to add the timestamp to the string. If the object is permanent, timestamp should be “111111z” (http://www.aprs.org/info/object-perm.txt)

Example:

printf "%s\n" "user yourHAMSIGN pass passcode" "yourHAMSIGN>APN100,TCPIP*:;ANOTHERSTATION_CALLSIGN *111111zlatitude/longtitude-comment" | ncat poland.aprs2.net 14580
printf "%s\n" "user S55MA-10 pass 22358" "S55MA-10>APN100,WIDE2-1*:;S55MA-14 *111111z4139.94N/01217.67E-test" | ncat --send-only poland.aprs2.net 14580

Note: ANOTHERSTATION_CALLSIGN is by protocol defined as 9 characters long and you need to add whitespaces between ANOTHERSTATION_CALLSIGN and *111111z
Example: S51Y has four characters only so you need to add 5 whitespaces between ANOTHERSTATION_CALLSIGN and *111111z
The string would look like:

printf "%s\n" "user S55MA-10 pass 22358" "S55MA-10>APN100,WIDE2-1*:;S51Y     *111111z4139.94N/01217.67E-test" | ncat --send-only poland.aprs2.net 14580

If you don’t want to use one line command, you can create a simple script (for placing your own station):

#!/bin/bash

#Define login info
user=yourHAMSIGN
password=passcode

#Define object user info
senduser=yourHAMSIGN

#Define APRS-IS server
server=poland.aprs2.net
port=14580

#Define station location
lat=4146.72N
lon=01213.80E

#Define data
comment="QTH"
data="$senduser>APN100,TCPIP*:=${lat}/${lon}-${comment}"

#Send data to the server
printf "%s\n" "user $user pass $password" "${senduser}>APN100,TCPIP*:=${lat}/${lon}-${comment}" | ncat poland.aprs2.net 14580

NOTE: Don’t send data to often. For objects it’s sufficient to send it every few hours. Don’t spam the network.

You can send telemetry the same way but it’s a little bit trickier because APRS protocol has coeficients for displaying the correct values.
For example let’s say we’ll read a raspberryPI CPU temperature and send it to APRS-IS network.

#!/bin/bash
#Define login info
user=yourHAMSIGN
password=passcode

#Define object user info
senduser=yourHAMSIGN

#Define APRS-IS server
server=poland.aprs2.net
port=14580

#Define station location
lat=4146.72N
lon=01213.80E

#Define data
comment="QTH"
data="$senduser>APN100,TCPIP*:=${lat}/${lon}-${comment}"

#Authentication variable
aprsauth="user $user pass $password"

#Read raspberry-pi CPU temperature
tempraw=/opt/vc/bin/vcgencmd measure_temp #Read pi temperature

#Filter result to numbers only 
tempfloat="$(echo "$tempraw" | awk -F= '{print $2}' | awk -F\' '{print $1}')"

#Aprs telemetry protocol accepts 3 whole (int) 
#numbers only so we need
#to convert the result (tempfloat) into 3 whole 
#numbers. So if tempraw=40.3, it will
#convert it to 403. If tempraw=8.5, it will convert 
#it to 85 and we'll add the leading zero
#to create 3 number format 085 later bellow.
temp="$(echo "$tempfloat * 10" | bc | awk -F. '{print $1}')"

#Project comment
projectcomment=Rpi temperature

#Generate telemetry strings
#Read data and put it into variable
#%s means string
#%03d means prepend up to 3 zeroes, so if the value is 8, 
#you'll get 008, if the value is 80, you'll get 080 etc.
#This needs to be done or APRS will deny the packets as invalid. 
#The other things is, everytime you send the telemetry,
#a sequence number has to change, it's defined as T# in a APRS protocol. 
#We will automate this next.

#Check if file exist
if [ ! -f "/tmp/sequence_number.txt" ]; then
 touch /tmp/sequence_number.txt
fi

#Read sequence number. Everytime the scripts runs, the number will 
#rise by 1 until it comes
#to 1000 and then returns back to 0. Everytime the script
#will run, a sequence number will change.
read num < /tmp/sequence_number.txt
num=$((num + 1))
if (( num == 1000 )); then
 num=0
fi 

#Finally, we can start assembling the data. 
#$senduser goes to %s, $num goes to first %03d and $temp goes to 
#the last %03d in the string. 
printf -v t1 "%s>APN001,TCPIP*:T#%03d,%03d,000,000,000,000,00000000" "$senduser" "$num" "$temp"

#Define telemetry parameters
t2="$user>APN001,TCPIP*::$senduser :PARM.CPU Temp"

#Define telemetry units
t3="$user>APN001,TCPIP*::$senduser :UNIT.Deg.C"

#Add telemetry coefficient so the APRS protocol can convert your raw values
#into real value.
#We get the value in 3 whole numbers and we need to define coefficient so 
#the APRS protocol
#will know how to display the value. We add 0.1 to the second field, means
#if the value is 452, the temperature will be displayed as 45.2
t4="$user>APN001,TCPIP*::$senduser :EQNS.0,0.1,0,0,0,0,0,0,0,0,0,0,0,0,0"

#Send bits and project comment
t5="$user>APN001,TCPIP*::$senduser :BITS.00000000,$projectcomment"

#Another tricky part is, $senduser total lenght has to be 9 characters. 
#For example
#If my $senduser=S55MA-10 means it's only 8 characters long and we need 
#to add 1 space to it. S55MA-10 :PARM
#If my $senduser=S55MA means it's only 5 characters long and we need to 
#add 4 spaces to it S55MA    :PARM
#The same goes for UNIT, EQNS and BITS

#Send data to the server
#For telemetry to work we need to have an object before, from previous script.
#We'll only send an object and telemetry non value data every hour so we don't 
#spam the network.
#We need to compare dates to see if 1 hour is past.

#Check if file exist
if [ ! -f "/tmp/date.txt" ]; then
   echo 0 > /tmp/date.txt
fi

#calculate time difference
read olddate < /tmp/date.txt
date="$(date +%s)"
diff="$(echo "$date - $olddate" | bc)"

#If 3600 is past, execute the first command, else other
if [ "$diff" -gt 3600 ]; then
   printf "%s\n" "$aprsauth" "$data" | ncat --send-only $server $port #this is your QTH object from the first script
   printf "%s\n" "$aprsauth" "$t1" "$t2" "$t3" "$t4" "$t5" | ncat --send-only $server $port 
   echo "$date" > /tmp/date.txt
else
   printf "%s\n" "$aprsauth" "$t1" | ncat --send-only $server $port
fi
#Write the last sequence number.
echo "$num" > /tmp/sequence_number.txt

Telemetry should form on aprs.fi, for example: https://aprs.fi/telemetry/a/S55MA-10
Note, formatting in script might be broken due html formatting, here is a raw script: https://pastebin.com/24CaMXLT

I’ve bought an affordable geiger counter board that fits on a Raspberry pi zero (https://www.tindie.com/products/granzscientific/raspberry-pi-zero-iot-geiger-counter/).  I’ve modified original software and added some scripts to send radiation readings to the APRS network. I’ve also added a Munin plugin. Go to the github project site for instructions: https://github.com/s55ma/granzscientific-geiger-counter-APRS

Instal libav-tools

sudo apt-get update
sudo apt-get install libav-tools

Install youtube-dl

sudo curl -L https://yt-dl.org/downloads/latest/youtube-dl -o /usr/local/bin/youtube-dl
sudo chmod a+rx /usr/local/bin/youtube-dl

Download mp3

youtube-dl --extract-audio --audio-format mp3 --audio-quality 0 -o '%(title)s.%(ext)s' https://www.youtube.com/watch?v=ID

–audio-quality 0 means the best quality available
-o ‘%(title)s.%(ext)s’ will remove the ID from the filename

Download the file from a web browser (optional if you don’t have FTP, SFTP, are on a Windows bashless box)

For python bellow the version 3

python -m SimpleHTTPServer

For python 3 or higher

python3 -m http.server

Now just browse to http://your-server-IP:8000 and download the file

My SDRsharp was often crashing so I wanted to use rtl_fm CLI (command line interace) to receive NOAA images. I found this post http://www.rtl-sdr.com/an-alternative-noaa-weather-satellite-tutorial-using-rtl_fm-and-wxtoimg/ which was poorly and incompletely written but it gave me a jump start.

This was tested on a 64bit Windows 7. I assume you have Zadig drivers working already (http://www.rtl-sdr.com/tag/zadig/)

The software:

Theory:

WxToImg will send commands to MCE controller which will start rtl_fm and sox applications which will pipe the audio to virtual audio cable. WxToImg will listen to virtual audio interface and capture the data.

TL;DR: WxToImg -> MCE -> rtl_fm+sox -> Virtual audio cable -> WxToImg

NOTICE: This tutorial does not include doppler shift correction but with NOAA it’s not that important.

1. Install Virtual Audio Cable

The following step is optional but recommended. We’ll need it later for the sox.

Go to playback devices (right click on the speaker in the taskbar).

Right click on your VB-Audio Virtual Cable, properties and rename it to Vcable.


2. Download and install sox (https://sourceforge.net/projects/sox/files/sox)

If you get missing DLL files when runing sox, install Microsoft Visual C++ 2010 Service pack 1 Redistributable package MFC security update.

3. Download rtl_fm software and unzip it (http://osmocom.org/attachments/download/2242/RelWithDebInfo.zip)

4. Download and install Virtual Serial port driver (https://www.eltima.com/download/vspd.exe)

Open the app, select two COM ports and click add pair.

You end up with COM2 and COM3 in the left menu. You can choose different ports, but you need to reflect that in WxToImg and later in MCE controller settings.

5. Download and install MCE control (https://github.com/tig/mcec/releases/download/1.9.0/MCEController.Setup.exe)

Open it and go to Settings -> Serial server

Tick Enable serial server

Port: COM3

Baud rate: 2400

6. Install WxToImg and register it with this data:

Name: Carl Rakotondrainibe
Email: carl@Rakotondrainibe.com
Key: EA5M-N3VZ-R6HZ-CFF9-7FC2

Setup all your preferences and go to Options -> Recording options

Under Common recording options:

soundcard: Vcable

receiver type: select Baykal (unregistered version is missing this option)

receiver port: COM2

receiver baud rate: 2400

Save and exit

MCE controller and WxToImg should now be connected together with COM2 – COM3 pair we created earlier.

7. Create a file for MCE controller commands.

MCE will recognize the commands sent by WxToImg and start rtl_fm and sox.

Find your MCEcontrol.exe location (usually in “C:\Program Files (x86)\Kindel Systems\MCE Controller\”)

Go to that folder and create a new file named MCEControl.commands

Add this text to it and save it:

<?xml version="1.0" encoding="utf-8"?>
<MCEController xmlns:xsd="http://www.w3.org/2001/XMLSchema" xmlns:xsi="http://www.w3.org/2001/XMLSchema-instance">
<Commands xmlns="http://www.kindel.com/products/mcecontroller">
<!-- Place command definitions here -->
<!--
==================================================================
StartProcess Commands
File: The full path to the executable you want to start.
==================================================================
-->
<StartProcess Cmd="RF01376200" File="F:\satreceive\noaa15.bat"/>
<StartProcess Cmd="RF01379125" File="F:\satreceive\noaa18.bat"/>
<StartProcess Cmd="RF01371000" File="F:\satreceive\noaa19.bat"/>
<StartProcess Cmd="RF01375000" File="F:\satreceive\noaa19.bat"/>
<StartProcess Cmd="MUA" File="F:\satreceive\killrtl.bat"/>
</Commands>
</MCEController>

IMPORTANT: Change the path of the bat files to your own location. Bat files are included in the next steps.

Just a brief explanation of the MCEcontrol.commands file:

Cmd="RF01376200"

= Command sent by WxToImg, a frequency of the NOAA15 Satellite and must be linked with noaa15.bat

Cmd="MUA" File="F:\satreceive\killrtl.bat"

= Command sent by WxToImg to start and stop recording

8. Bat files (make sure to edit them to match your sox, rtl_fm locations and rtl_fm device settings like gain and ppm correction):

noaa15.bat

REM start minimized
if not DEFINED IS_MINIMIZED set IS_MINIMIZED=1 && start "" /min "%~dpnx0" %* && exit

@echo off
REM setup paths, mind the end backslash

SET sox_path="F:\Program Files (x86)"\sox-14-4-2\
SET rtl_fm_path=F:\rtl-sdr-release\x64\
REM set RTL device number, run rtl_test, usually it's device 0 with only 1 dongle connected
REM set gain
REM set ppm correction
REM set your audio device, usually virtual audio cable

SET device=0
SET gain=49.6
SET ppm_correction=1
SET audiodevice=Vcable

REM Run sox and rtl_fm
%sox_path%sox.exe -r 48000 -t raw -es -b 16 -c 1 "|%rtl_fm_path%rtl_fm.exe -d %device% -f 137.62M -s 48000 -g %gain% -p %ppm_correction% -F 9 -A fast -E DC" -t waveaudio %audiodevice%

exit

noaa18.bat

REM start minimized
if not DEFINED IS_MINIMIZED set IS_MINIMIZED=1 && start "" /min "%~dpnx0" %* && exit

@echo off
REM setup paths, mind the end backslash

SET sox_path="F:\Program Files (x86)"\sox-14-4-2\
SET rtl_fm_path=F:\rtl-sdr-release\x64\

REM set RTL device number, run rtl_test, usually it's device 0 with only 1 dongle connected
REM set gain
REM set ppm correction
REM set your audio device, usually virtual audio cable

SET device=0
SET gain=49.6
SET ppm_correction=1
SET audiodevice=Vcable

REM Run sox and rtl_fm
%sox_path%sox.exe -r 48000 -t raw -es -b 16 -c 1 "|%rtl_fm_path%rtl_fm.exe -d %device% -f 137.9125M -s 48000 -g %gain% -p %ppm_correction% -F 9 -A fast -E DC" -t waveaudio %audiodevice%

exit

noaa19.bat

REM start minimized
if not DEFINED IS_MINIMIZED set IS_MINIMIZED=1 && start "" /min "%~dpnx0" %* && exit

@echo off
REM setup paths, mind the end backslash

SET sox_path="F:\Program Files (x86)"\sox-14-4-2\
SET rtl_fm_path=F:\rtl-sdr-release\x64\

REM set RTL device number, run rtl_test, usually it's device 0 with only 1 dongle connected
REM set gain
REM set ppm correction
REM set your audio device, usually virtual audio cable

SET device=0
SET gain=49.6
SET ppm_correction=1
SET audiodevice=Vcable

REM Run sox and rtl_fm
%sox_path%sox.exe -r 48000 -t raw -es -b 16 -c 1 "|%rtl_fm_path%rtl_fm.exe -d %device% -f 137.1M -s 48000 -g %gain% -p %ppm_correction% -F 9 -A fast -E DC" -t waveaudio %audiodevice%

exit

killrtl.bat

@echo off
taskkill /IM rtl_fm.exe /F

Everything should be set now. You can test it by going to WxToImg File -> Manual Test

You should see some data in the MCE Controller, bat file executed and WxToImg recording:


Main apps needed:
– WxToImg
– Predict
– Rtl-SDR
– Sox
– Dropbox bash uploader
– Some essential packages
– A script to link it all together, provided by a reddit user the2belo. Check out the sources at the bottom of this post.

apt-get update
apt-get install curl git-core git cmake at predict sox libusb-1.0-0-devx-fmt-all build-essential libasound-dev libpulse-dev -y
cat <<EOF >no-rtl.conf
blacklist dvb_usb_rtl28xxu
blacklist rtl2832
blacklist rtl2830
EOF
mv no-rtl.conf /etc/modprobe.d/
git clone git://git.osmocom.org/rtl-sdr.gi
cd rtl-sdr/
mkdir build
cd build
cmake ../ -DINSTALL_UDEV_RULES=ON
make
make install
ldconfig
cd ~
cp ./rtl-sdr/rtl-sdr.rules /etc/udev/rules.d/
reboot
rtl_test

Output should look similar to this:
root@rpi:~/wxsat# rtl_test
Found 1 device(s):
0: Realtek, RTL2838UHIDIR, SN: 00000001

Using device 0: Generic RTL2832U OEM
Found Rafael Micro R820T tuner
Supported gain values (29): 0.0 0.9 1.4 2.7 3.7 7.7 8.7 12.5 14.4 15.7 16.6 19.7 20.7 22.9 25.4 28.0 29.7 32.8 33.8 36.4 37.2 38.6 40.2 42.1 43.4 43.9 44.5 48.0 49.6
[R82XX] PLL not locked!
Sampling at 2048000 S/s.

Info: This tool will continuously read from the device, and report if
samples get lost. If you observe no further output, everything is fine.

Reading samples in async mode…

wget http://www.wxtoimg.com/beta/wxtoimg-armhf-2.11.2-beta.deb
dpkg -i wxtoimg-armhf-2.11.2-beta.deb
wxtoimg

Accept.

predict

Setup your QTH.

cd ~
mkdir wxsat
wget https://raw.githubusercontent.com/the2belo/wxsat-scheduler/master/noaa-scheduler.sh
chmod +x noaa-scheduler.sh
mkdir images recordings

Edit noaa-scheduler.sh to reflect your location.

Change -L parameter
/usr/local/bin/wxmap -T “NOAA ${bird}” -H ~/wxsat/weather.txt -L “35.47/136.76/20” -p0 -o “\$mapdate” ~/wxsat/noaa${bird}map.png

Format is: (lat/lon/alt meters)
Use this site to get lat and lon for your location http://www.latlong.net/lat-long-dms.html

Edit noaa-scheduler.sh for gain and SDR dongle ppm correction:

timeout $rectime /usr/local/bin/rtl_fm -d 0 -f ${freq}M -s 48000 -g 44.5 -p 1 -F 9 -A fast -E DC ~/wxsat/recordings/NOAA${bird}-\$recdate.raw

-g = gain

-p = ppm

Play with gain settings to get the best results.

You also need to add the timezone for the script, add

export TZ='UTC date'

in a new line after #!/bin/bash and after cat << EOF > ~/wxsat/noaa${bird}.at

This is how it looks like in a final version: https://pastebin.com/3uWcp9wi

Script generates MCIR and HCVT images by default, you can change this options. I also added -c option to crop telemetry from the sides of the pictures.

/usr/local/bin/wxtoimg -c -e MCIR -m ~/wxsat/noaa${bird}map.png ~/wxsat/recordings/NOAA${bird}-\$recdate.wav ~/wxsat/images/NOAA${bird}-MCIR-\$recdate.png

mkdir Dropbox-Uploader
cd Dropbox-Uploader
curl "https://raw.githubusercontent.com/andreafabrizi/Dropbox-Uploader/master/dropbox_uploader.sh" -o dropbox_uploader.sh
chmod +x dropbox_uploader.sh
./dropbox_uploader.sh

Follow the instructions.

Automate the proces. Commands bellow will be run every 12 hours.

crontab -e

00 */12 * * * atq | awk ‘{print $1}’ | sort -n | xargs atrm
01 */12 * * * ~/wxsat/noaa-scheduler.sh 15 137.620
02 */12 * * * ~/wxsat/noaa-scheduler.sh 18 137.9125
03 */12 * * * ~/wxsat/noaa-scheduler.sh 19 137.100
00 */12 * * * wget -qr https://www.celestrak.com/NORAD/elements/weather.txt -O ~/wxsat/weather.txt

Start the jobs immediately:

wget -qr https://www.celestrak.com/NORAD/elements/weather.txt -O ~/wxsat/weather.txt
~/wxsat/noaa-scheduler.sh 15 137.620
~/wxsat/noaa-scheduler.sh 18 137.9125
~/wxsat/noaa-scheduler.sh 19 137.100

If you are going to change the file noaa-scheduler.sh, you need to kill the existing jobs and restart them. Kill the jobs with:

atq | awk '{print $1}' | sort -n | xargs atrm

Sources:
https://www.reddit.com/r/RTLSDR/comments/5iuzbl/fully_automated_raspberry_pi_noaa_satellite/
https://gist.github.com/floehopper/99a0c8931f9d779b0998
https://github.com/the2belo/wxsat-scheduler

There is another piece of software to automatically receive NOAA and Meteor satellites, I have yet to check it out.

Link: https://github.com/cyber-atomus/autowx

EDIT: I have experienced some lag with webm streaming, scroll down for swf configuration.

Live stream camera (Foscam in my case) over the internet cheat sheet:

apt-get install software-properties-common
add-apt-repository ppa:mc3man/trusty-media
apt-get update
apt-get install ffmpeg

Create ffserver.conf file

nano /etc/ffserver.conf
HTTPPort 8090 # Port to bind the server to
HTTPBindAddress 0.0.0.0
MaxHTTPConnections 2000
MaxClients 15
MaxBandwidth 50000 # Maximum bandwidth per client
 # set this high enough to exceed stream bitrate
CustomLog -

<Feed feed1.ffm>
 File /tmp/feed1.ffm
 FileMaxSize 1g
 ACL allow localhost
 ACL allow 192.168.0.0 192.168.0.255
</Feed>

<Stream live.webm>
 Format webm
 Feed feed1.ffm

 VideoCodec libvpx
 VideoSize 640x480
 VideoFrameRate 30
 VideoBitRate 512
 VideoBufferSize 512
 NoAudio
 AVOptionVideo flags +global_header
 StartSendOnKey

</Stream>

<Stream status.html> # Server status URL
 Format status
 # Only allow local people to get the status
 ACL allow localhost
 ACL allow 192.168.0.0 192.168.0.255
</Stream>

<Redirect index.html> # Just an URL redirect for index
 # Redirect index.html to the appropriate site
 URL live.webm/
</Redirect>

Save, exit and start the services

ffserver > /dev/null 2>&1 &
ffmpeg -loglevel error -r 30 -i rtsp://user:pass@camera_IP:port/url http://LAN_IP_WHERE_FFSERVER_IS_RUNNING:8090/feed1.ffm /dev/null 2>/var/log/ffmpeg.log &

Visit http://LAN_IP_WHERE_FFSERVER_IS_RUNNING:8090/live.webm
For status go to http://LAN_IP_WHERE_FFSERVER_IS_RUNNING:8090/status.html

I have experienced some lag with the above configuration, here is the config for a swf streaming:

HTTPPort 8090 # Port to bind the server to
HTTPBindAddress 0.0.0.0
MaxHTTPConnections 2000
MaxClients 15
MaxBandwidth 50000 # Maximum bandwidth per client
 # set this high enough to exceed stream bitrate
CustomLog -

<Feed feed1.ffm>
 File /tmp/feed1.ffm
 FileMaxSize 1g
 ACL allow localhost
 ACL allow 192.168.0.0 192.168.0.255
</Feed>

<Stream live.ffm>
 Feed feed1.ffm

Format swf
VideoCodec flv
VideoFrameRate 30
VideoBufferSize 80000
VideoBitRate 100
# quality ranges - 1-31 (1 = best, 31 = worst)
VideoQMin 1
VideoQMax 5
VideoSize 1024x786
PreRoll 0
Noaudio

</Stream>

<Stream status.html> # Server status URL
 Format status
 # Only allow local people to get the status
 ACL allow localhost
 ACL allow 192.168.0.0 192.168.0.255
</Stream>

<Redirect index.html> # Just an URL redirect for index
 # Redirect index.html to the appropriate site
 URL live.ffm/
</Redirect>

Save and restart ffserver and ffmpeg.

Edit your index.html file to play swf file in the browser:

<html>
<head>
<meta charset="UTF-8">
<link rel="icon" href="favicon.ico" type="image/x-icon" />
<link rel="shortcut icon" href="favicon.ico" type="image/x-icon" />
<title>Site title</title>
<script type="text/javascript" src="swfobject.js"></script>
 <script type="text/javascript">
 swfobject.registerObject("myFlashContent", "9.0.0", "expressInstall.swf");
 </script>
 <script type="text/javascript">
 swfobject.embedSWF("http://FF_SERVER_IP:8090/live.ffm", "myContent", "1024", "786", "9.0.0");
 </script>
</head>
<body>
<p align="top">Some optional text.</p>
 <div id="myContent">
 <p>Live stream</p>
 </div>
</video>

</body>

Enable I2C with raspi-config and reboot

Check if the sensor is connected:

i2cdetect -y 1

The output should look like this:

root@rpikiosk:~# i2cdetect -y 1
     0  1  2  3  4  5  6  7  8  9  a  b  c  d  e  f
00:          -- -- -- -- -- -- -- -- -- -- -- -- --
10: -- -- -- -- -- -- -- -- -- -- -- -- -- -- -- --
20: -- -- -- 23 -- -- -- -- -- -- -- -- -- -- -- --
30: -- -- -- -- -- -- -- -- -- -- -- -- -- -- -- --
40: 40 -- -- -- -- -- -- -- -- -- -- -- -- -- -- --
50: -- -- -- -- -- -- -- -- -- -- -- -- -- -- -- --
60: -- -- -- -- -- -- -- -- -- -- -- -- -- -- -- --
70: -- -- -- -- -- -- -- 77

Our HTU21D device is detected as the number 40 in the line 40, so the address is 0X40.

#!/usr/bin/python
import struct, array, time, io, fcntl

I2C_SLAVE=0x0703
HTU21D_ADDR = 0x40
CMD_READ_TEMP_HOLD = "\xE3"
CMD_READ_HUM_HOLD = "\xE5"
CMD_READ_TEMP_NOHOLD = "\xF3"
CMD_READ_HUM_NOHOLD = "\xF5"
CMD_WRITE_USER_REG = "\xE6"
CMD_READ_USER_REG = "\xE7"
CMD_SOFT_RESET= "\xFE"

class i2c(object):
   def __init__(self, device, bus):

      self.fr = io.open("/dev/i2c-"+str(bus), "rb", buffering=0)
      self.fw = io.open("/dev/i2c-"+str(bus), "wb", buffering=0)

      # set device address

      fcntl.ioctl(self.fr, I2C_SLAVE, device)
      fcntl.ioctl(self.fw, I2C_SLAVE, device)

   def write(self, bytes):
      self.fw.write(bytes)

   def read(self, bytes):
      return self.fr.read(bytes)

   def close(self):
      self.fw.close()
      self.fr.close()

class HTU21D(object):
   def __init__(self):
      self.dev = i2c(HTU21D_ADDR, 1) #HTU21D 0x40, bus 1
      self.dev.write(CMD_SOFT_RESET) #soft reset
      time.sleep(.1)

   def ctemp(self, sensorTemp):
      tSensorTemp = sensorTemp / 65536.0
      return -46.85 + (175.72 * tSensorTemp)

   def chumid(self, sensorHumid):
      tSensorHumid = sensorHumid / 65536.0
      return -6.0 + (125.0 * tSensorHumid)

   def crc8check(self, value):
      # Ported from Sparkfun Arduino HTU21D Library: https://github.com/sparkfun/HTU21D_Breakout
      remainder = ( ( value[0] << 8 ) + value[1] ) << 8
      remainder |= value[2]
      
      # POLYNOMIAL = 0x0131 = x^8 + x^5 + x^4 + 1
      # divsor = 0x988000 is the 0x0131 polynomial shifted to farthest left of three bytes
      divsor = 0x988000
      
      for i in range(0, 16):
         if( remainder & 1 << (23 - i) ): remainder ^= divsor divsor = divsor >> 1
      
      if remainder == 0:
         return True
      else:
         return False
   
   def read_tmperature(self):
      self.dev.write(CMD_READ_TEMP_NOHOLD) #measure temp
      time.sleep(.1)

      data = self.dev.read(3)
      buf = array.array('B', data)

      if self.crc8check(buf):
         temp = (buf[0] << 8 | buf [1]) & 0xFFFC
         return self.ctemp(temp)
      else:
         return -255
         
   def read_humidity(self):
      self.dev.write(CMD_READ_HUM_NOHOLD) #measure humidity
      time.sleep(.1)

      data = self.dev.read(3)
      buf = array.array('B', data)
      
      if self.crc8check(buf):
         humid = (buf[0] << 8 | buf [1]) & 0xFFFC
         return self.chumid(humid)
      else:
         return -255
         
if __name__ == "__main__":
   obj = HTU21D()
   print "Temp:", obj.read_tmperature(), "C"
   print "Humid:", obj.read_humidity(), "% rH"

Run the script:

root@rpikiosk:~# ./HTU21DF.py
Temp: 22.9382104492 C
Humid: 45.0101318359 % rH

If you connect the ground wire to the wrong Rpi pin, you’ll get this error:

IOError: [Errno 5] Input/output error


Pi-Hole is a DNS based ad blocker. You can install it on a Debian based Linux distributions. To use it together with a PfSense firewall you need to change a few firewall settings:

  • Login to your PfSense and go to System -> General Setup:

In the first DNS Server field insert the IP of your Pi-Hole computer and save changes

  • Go to Services -> DNS Resolver:

Tick Enable DNS resolver

Tick Enable DNSSEC Support

Tick Enable Forwarding Mode (this will tell the PfSense to use a DNS server that we configured in a general settings in the previous step)

Save and that’s it.

This post will show you how to generate weather data from LA Crosse WS2300 series weather stations for submission to the APRS network.

APRS software I’m using is Xastir, but you can use this setup to push the weather data to other APRS applications also. Digipeater mode is already set up in Xastir. This post will not cover digipeating WX data.

1. Install packages

apt-get update

apt-get install  bc ncat unzip gcc build-essential

2. Download open2300 and compile fetch2300

Fetch2300 is part of open2300, it’s used to connect to the weather station and return the data. Credit goes to Kenneth Lavrsen (http://www.lavrsen.dk/foswiki/bin/view/Open2300)

wget -O "open2300-1-10.zip" https://sourceforge.net/projects/open2300/files/open2300/1.10/open2300-1.10.zip/download"

unzip open2300-1-10.zip

cd open2300-1.10

make fetch2300

cp fetch2300 /usr/local/bin/fetch2300


3. Edit  and rename open2300 config file named open2300-dist.conf or copy mine to /etc/open2300/open2300.conf

mkdir -p /etc/open2300

nano /etc/open2300/open2300.conf
SERIAL_DEVICE /dev/ttyUSB1 #/dev/ttyS0, /dev/ttyS1, COM1, COM2 etc
TIMEZONE 1 # Hours Relative to UTC. East is positive, west is negative
WIND_SPEED km/h # select MPH (miles/hour), m/s, or km/h
TEMPERATURE F # Select C or F
RAIN IN # Select mm or IN
PRESSURE hPa # Select hPa, mb or INHG

Note: make sure you select the correct SERIAL_DEVICE in the config. The station in my setup

is connected via USB to RS232 converter so the device is ttyUSB0. Also, don’t change the units, bash script will automatically convert them to be compatible with APRS network.

4. Copy bash script to desired location

mkdir -p /root/ws2300/

nano wxdata_v1.6.sh
#!/bin/bash

#This script reads weather data via fetch program which is part of Open2300 suite written by Kenneth Lavrsen (http://www.
#lavrsen.dk/foswiki/bin/view/Open2300/WebHome).
#It outputs the right data needed to feed Xastir for APRS weather reports. The scripts utilizes Ncat utility as server to
#serve the fetched output to Xastir.
#Fetched Data is pushed to Ncat server and then to Xastir. (Fetched data -> Ncat server -> Xastir)
#Ncat is part of Nmap, get it by installing Nmap.
#This script should work for LaCrosse weather stations, WS23xx series. Testing was done with WS2307.
#Written by S55MA and S56IUL, May 2016

#DEFINE VARIABLES
host="127.0.0.1"
port="1234"

#Start the Ncat server
chkncat=$(netstat -ant | grep $host:$port | grep -c LISTEN)
if [ "$chkncat" -ge "1" ]
then
echo "ncat already running, nothing to do"
else
nohup ncat -k -l --broker $host $port &>/dev/null &
fi

#Start while loop
while true; do

echo "start `date`"

datetime=$(date '+%Y%m%d%H%M%S')
ws2300config="/etc/open2300/open2300.conf"
/usr/local/bin/fetch2300 $ws2300config > /tmp/wxdata-"$datetime".tmp
fetch_path="/tmp/wxdata-$datetime.tmp"
chkfile=$(ls -la $fetch_path | awk -F ' ' '{ print $5 }')

if [ "$chkfile" -le "43" ]
then
echo "No Data"
sleep 30
else
tempF=$(cat "$fetch_path" | grep To | grep -v 'min\|max\|DRtot\|TRtot' | awk '{print $2}')
temp1=$(echo "$tempF" | awk '{ printf ("%d\n",$1 + 0.5)}')
if [ "$temp1" -ge "99" ] || [ "$temp1" -le "-99" ]
then
temp="$temp1"
else
if [ "$temp1" -le "-1" ]
then
if [ "$temp1" -ge "-9" ]
then
temp2=$(echo "$temp1" | sed 's/[-]//g')
temp=$(echo -0"$temp2")
else
temp2=$(echo "$temp1" | sed 's/[-]//g')
temp=$(echo -"$temp1")
fi
else
temp=$(echo 0"$temp1")
fi
fi

windspeed2=$(cat "$fetch_path" | grep -m1 WS | grep -v 'min\|max\|DRtot\|TRtot'| awk '{print $2/1.609344}' | awk '{ printf ("%d\n",$1 + 0.5)}')
if [ "$windspeed2" -le "9" ]
then
windspeed=$(echo 00"$windspeed2")
else
if [ "$windspeed2" -le "99" ]
then
windspeed=$(echo 0"$windspeed2")
else
windspeed=$(echo "$windspeed2")
fi
fi

winddirection2=$(cat "$fetch_path" | grep DIR0 | awk '{print $2}' | sed 's/\..*$//')
if [ "$winddirection2" -le "9" ]
then
winddirection=$(echo 00"$winddirection2")
else
if [ "$winddirection2" -le "99" ]
then
winddirection=$(echo 0"$winddirection2")
else
winddirection=$(echo "$winddirection2")
fi
fi

rain1h=$(cat "$fetch_path" | grep R1h | grep -v 'min\|max' | awk '{print $2}' | sed 's/[.]//g')
rain24h=$(cat "$fetch_path" | grep R24h | grep -v 'min\|max' | awk '{print $2}' | sed 's/[.]//g')

airpressureR=$(cat "$fetch_path" | grep RP | grep -v 'min\|max' | awk '{print $2}')
airpressure2=$(echo "scale=1;$airpressureR / 1" | bc | sed 's/[.]//g')
if [ "$airpressure2" -le "9999" ]
then
airpressure=$(echo 0"$airpressure2")
else
airpressure=$(echo "$airpressure2")
fi

relhumidity=$(cat "$fetch_path" | grep RHo | grep -v 'min\|max' | awk '{print $2}' | sed 's/\..*$//')

#Combine variables to forge Xastir string
xastir="c${winddirection}s${windspeed}t${temp}r${rain1h}p${rain24h}b${airpressure}h${relhumidity}xDvs"
printf "%s\n" "$xastir" | ncat --send-only $host $port
echo "$xastir"
sleep 3

rm -f /tmp/wxdata-*.tmp

echo "stop `date`"
echo "-----------------------------------"
fi

done

#EOS


If there are some formatting mistakes, the script is also available on pastebin: http://pastebin.com/29q8epF8

5. Start the script

/root/ws2300/wxdata_v1.6.sh

You should see output similar to that:

start Tue May 3 00:36:47 CEST 2016
c112s013t048b10037h85xDvs

Leave the script running, open another terminal and check if ncat is getting data:

ncat localhost 1234

Wait a few seconds and you should get the result similar to that:

c112s018t048b10037h85xDvs


6. Go to Xastir and add the WX interface

Interface -> Interface Control -> Add -> Networked WX

WX Host: 127.0.0.1

WX Port: 1234

Save and start the interface.

wx_interface

7. Go to Xastir, View -> Own Weather Data

You should see your own weather data from the station

wx_data

8. Start the script at boot and run it in background

Open /etc/rc.local and add

screen -d -m /root/ws2300/wxdata_v1.6.sh

Save and exit

Note: make sure you set your own path of the script location


My 5V RaspberryPi fan was very loud and annoying, so I wanted a solution to regulate the fan depending on the Pi temperature.

To achieve that, I used a mosfet switch, pulled out from an old computer motherboard, followed by some easy bash scripting.

Almost any mosfet from an old computer motherboard should work.

motherboard_mosfet

Wiring:

mosfet_fan_schematics

You can use any not used GPIO to connect the gate pin, in the picture above it’s #23.

mosfet_fan_schematics2

I connected the mosfet pin to GPIO 19 in my case. You can choose  your own.

Software:

sudo apt-get update
sudo apt-get install bc

Enable selected GPIO pin, In my case, GPIO 19

echo "19" > /sys/class/gpio/export
echo "out" > /sys/class/gpio/gpio19/direction

If you wan’t to select another GPIO and you already exported one GPIO, you need to unexport previous GPIO.

echo "19" > /sys/class/gpio/unexport

Bash script for controlling fan “speed”:

pico rpipwm.sh

Paste the script bellow, edit your GPIO pin and save:

#!/bin/bash
#Poor man's PWM
#16.11.2015 by S55MA
#Quick and dirty script for controlling fan speed on RaspberryPI
#No rights reserved

#Define GPIO pin
pin="19"

while true; do

#Read temp
temp=$(cat /sys/class/thermal/thermal_zone0/temp | awk 'NR == 1 { print $1 / 1000}' | cut -c -4)

#If temperature is equal or lower than 39.99, the fan will stop spinning
if [[ $(bc <<< "$temp <= 39.99") == 1 ]] ;
then
$(echo "0" > /sys/class/gpio/gpio$pin/value)
fi

#If temperature is between 40 and 42.99, the fan will start with 1 second burst and 1 second sleep
if [[ $(bc <<< "$temp >= 40 && $temp <= 42.99") == 1 ]] ;
then
$(echo "1" > /sys/class/gpio/gpio$pin/value; sleep 1; echo "0" > /sys/class/gpio/gpio$pin/value; sleep 1)
fi

#If temperature is between 43 and 47.99, the fan will start with 1 second burst and 0.5 second sleep
if [[ $(bc <<< "$temp > 43 && $temp <= 47.99") == 1 ]] ;
then
$(echo "1" > /sys/class/gpio/gpio$pin/value; sleep 1; echo "0" > /sys/class/gpio/gpio$pin/value; sleep 0.5)
fi

#If temperature is equal or higher than 48, the fan will start spinning constantly
if [[ $(bc <<< "$temp >= 48") == 1 ]] ;
then
$(echo "1" > /sys/class/gpio/gpio$pin/value)
fi
sleep 0.1
done
chmod +x rpipwm.sh
./rpipwm.sh

Enable auto start at boot:

sudo cp rpipwm.sh /etc/init.d/rpipwm.sh
sudo chmod +x /etc/init.d/rpipwm.sh
sudo update-rc.d /etc/init.d/rpipwm.sh defaults

or you can use crontab:

crontab -e

Add and save:

@reboot /path/to/script/rpipwm.sh
sudo update-rc.d cron defaults